Breast Lift Sydney Before & After Gallery
The displayed before and after pictures are provided as an educational tool to demonstrate some of the results achievable from plastic surgery. All surgeries on this page are performed by Dr Eddy Dona and are published with the written consent by the patients.
Before & after images are generally shown between 3-6 months post-surgery. These images are not a guarantee that you will have similar results, regardless of if you have a similar body type or shape. This is because, with each patient, many different variables exist that can affect the outcome.
All surgery carries risks, requires recovery time, and the results will vary for each individual patient.
The content on this page is general in nature and is not a substitute for a formal consultation. Before proceeding, please seek medical advice from an appropriately qualified medical practitioner.


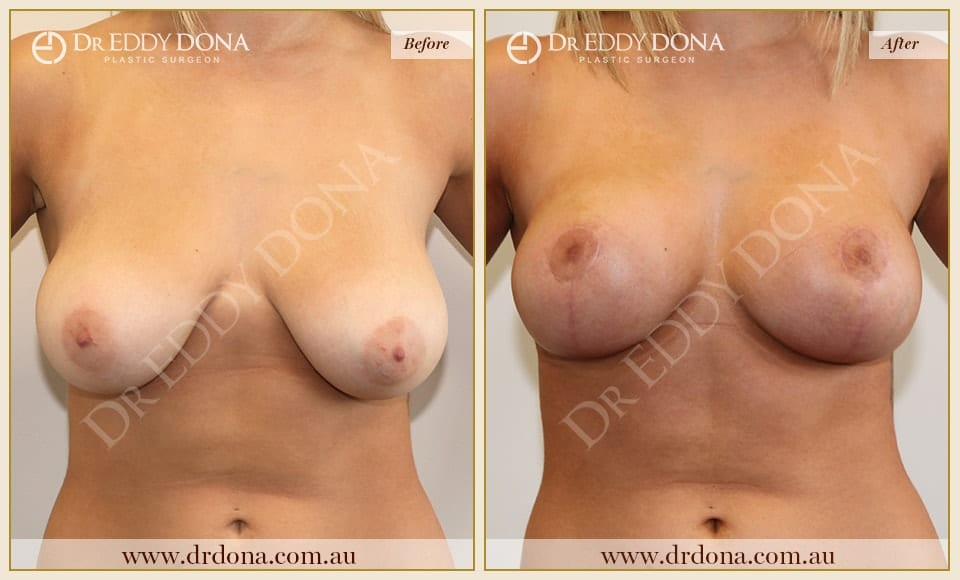
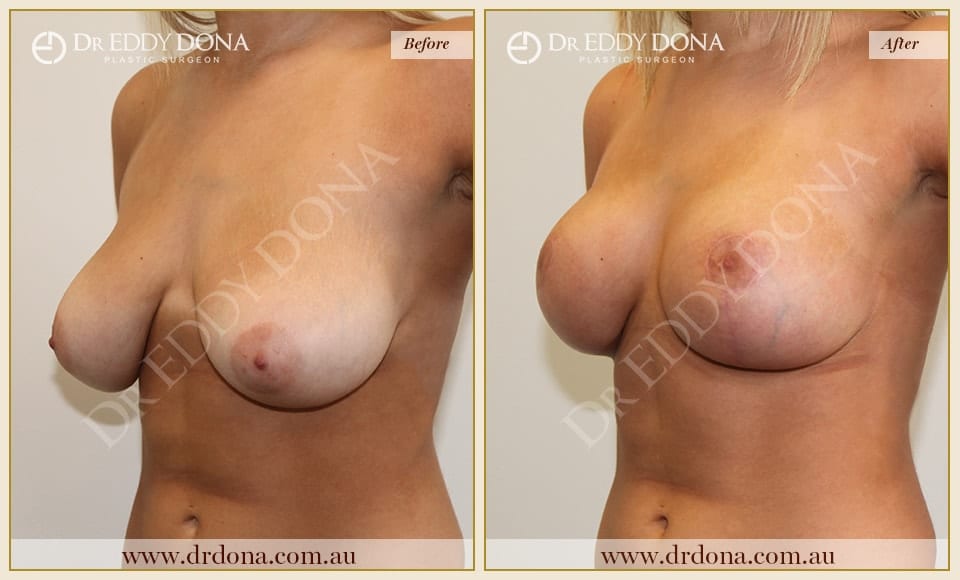


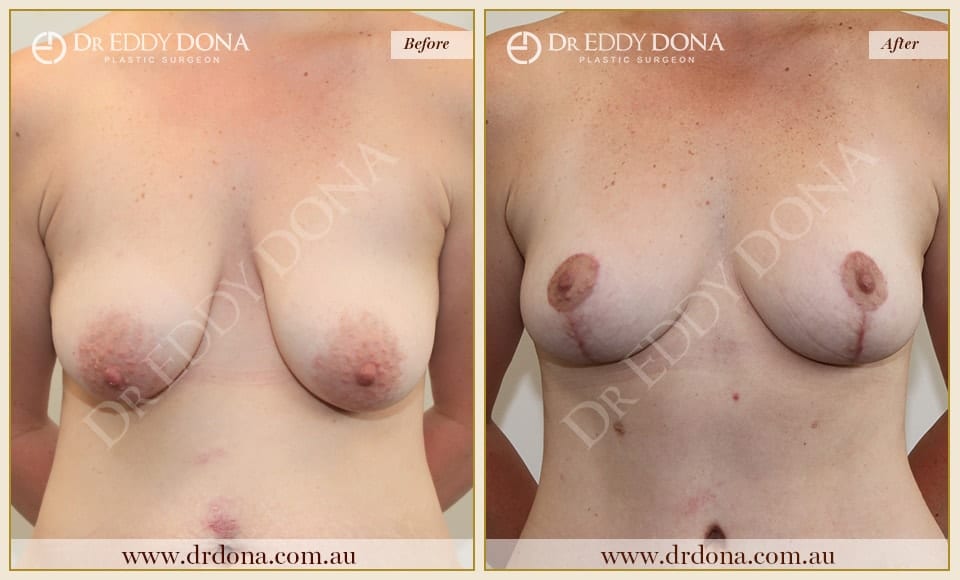
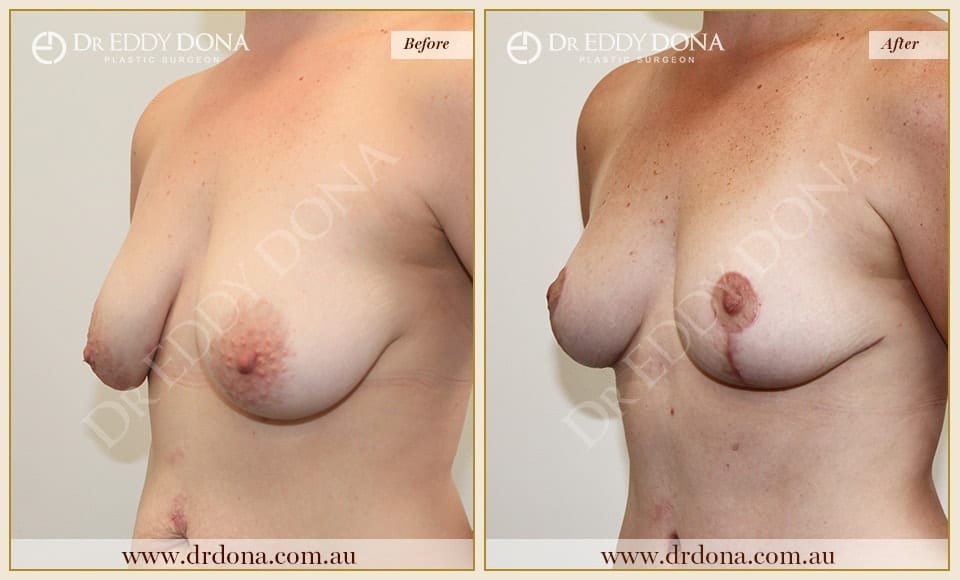
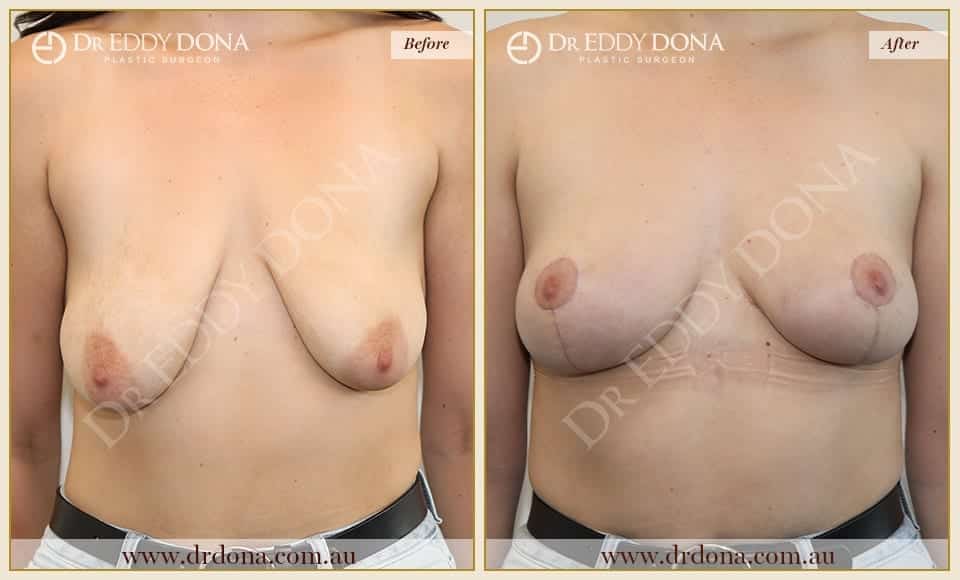
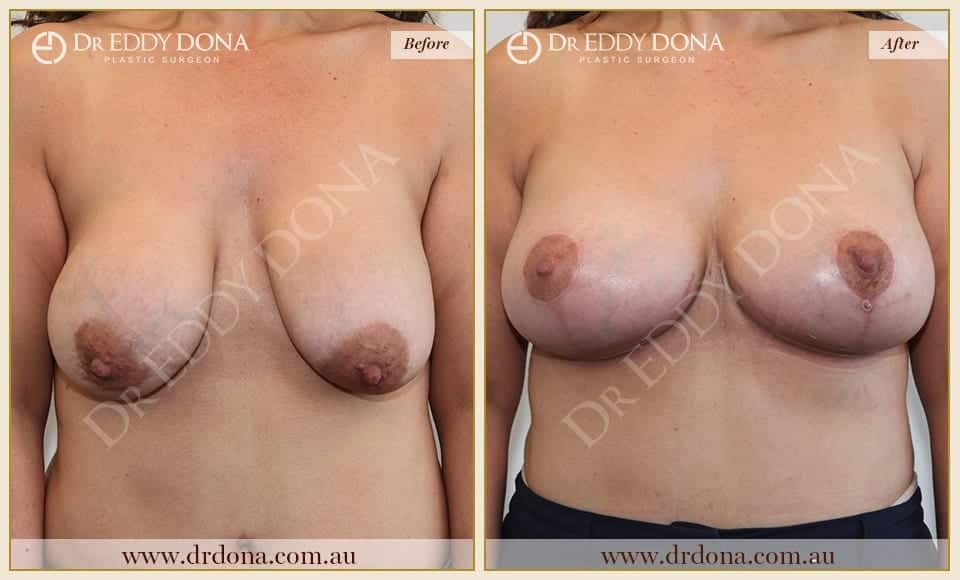
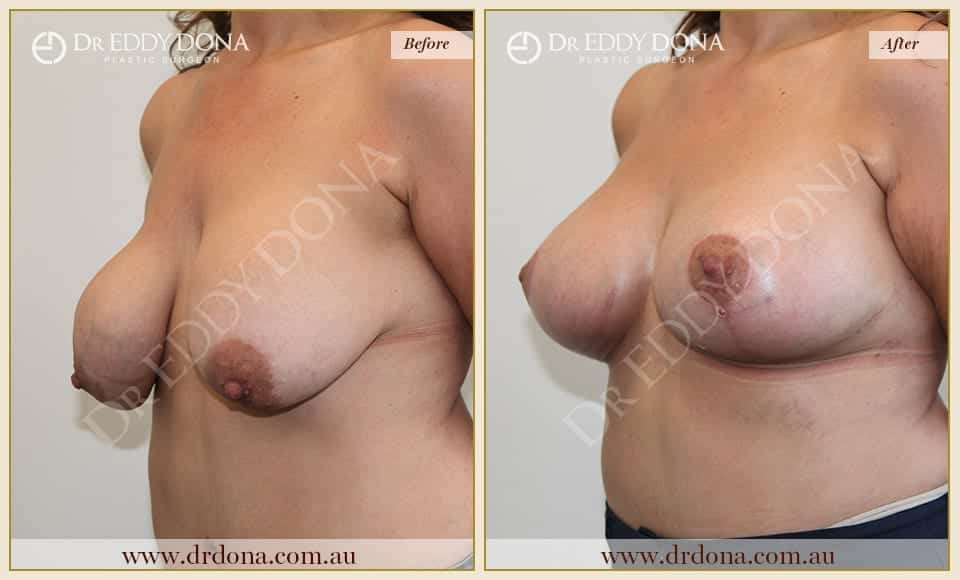
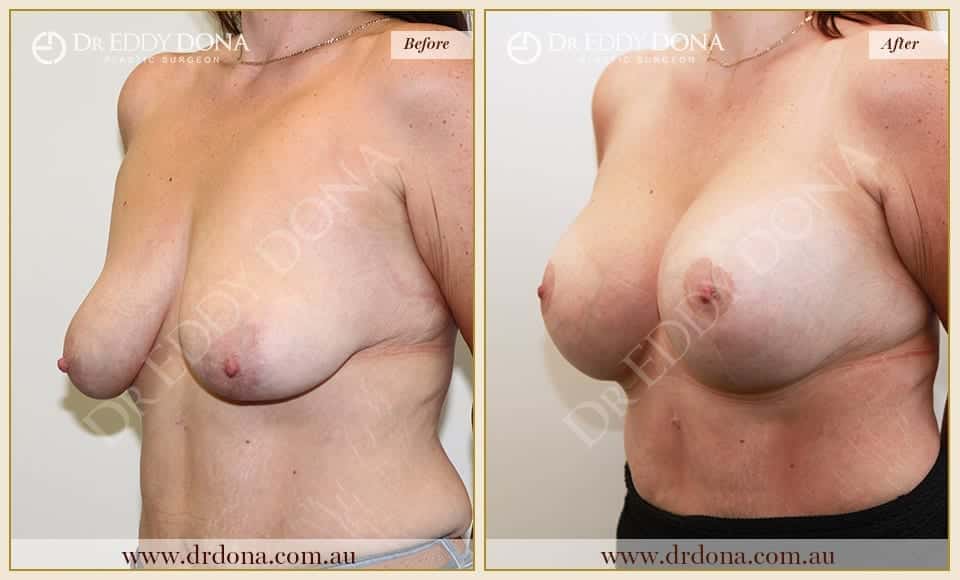
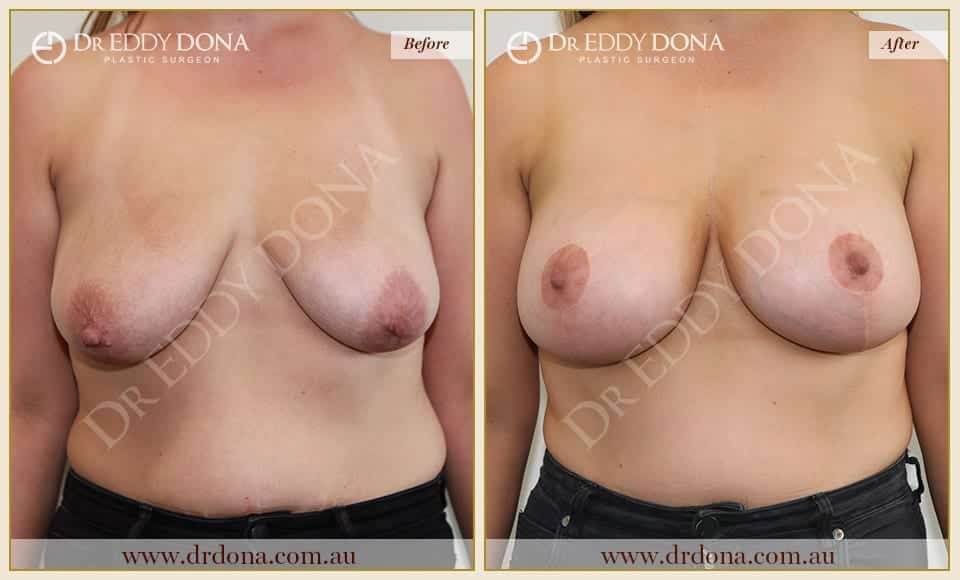
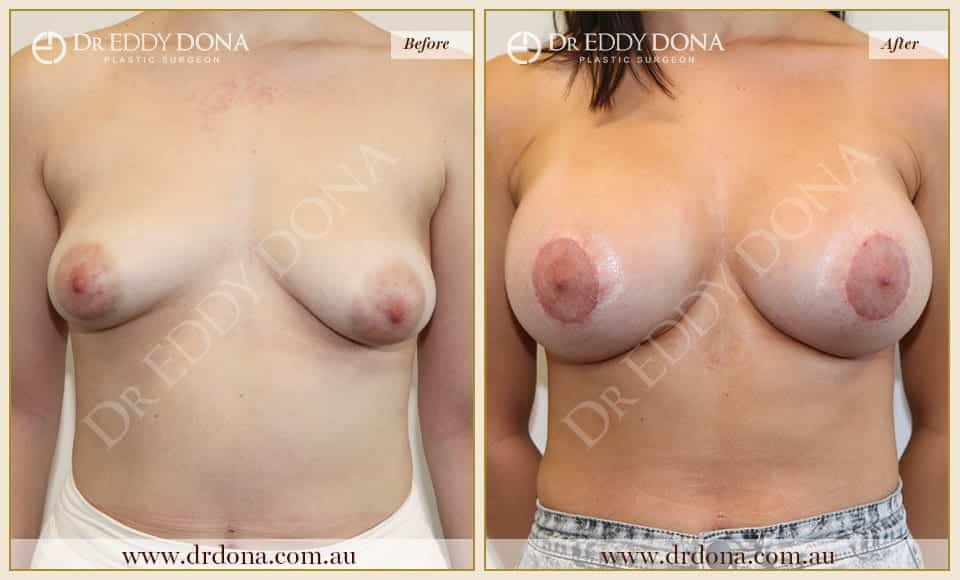
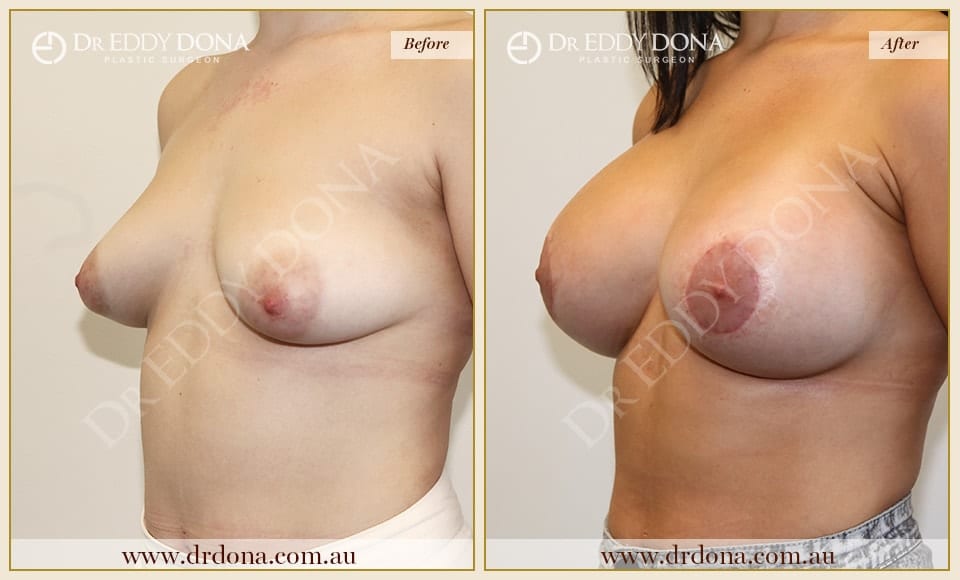
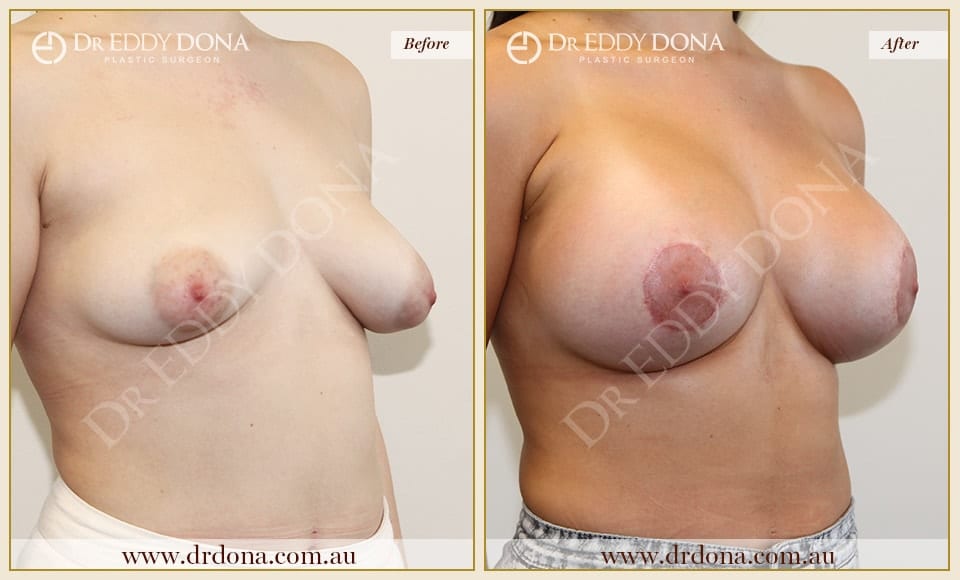
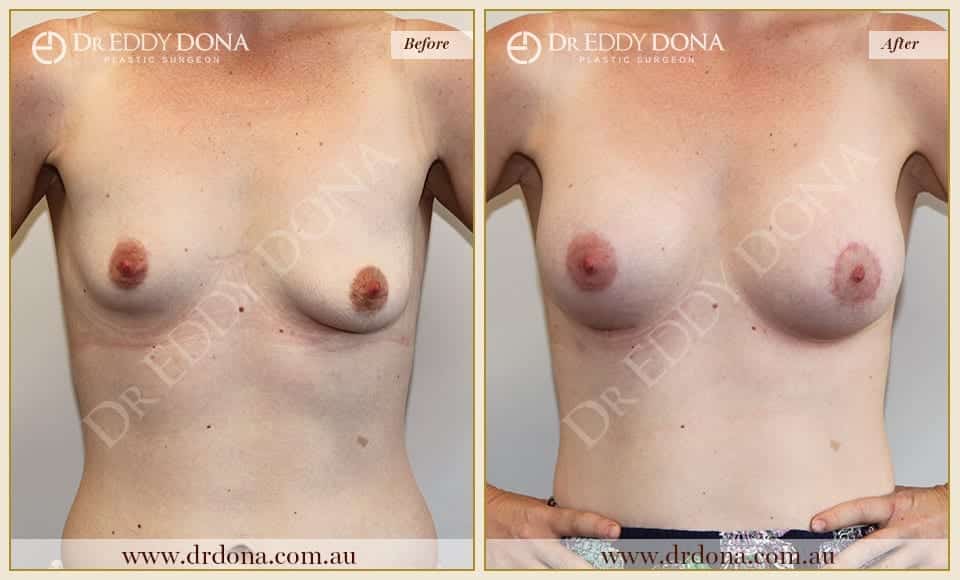
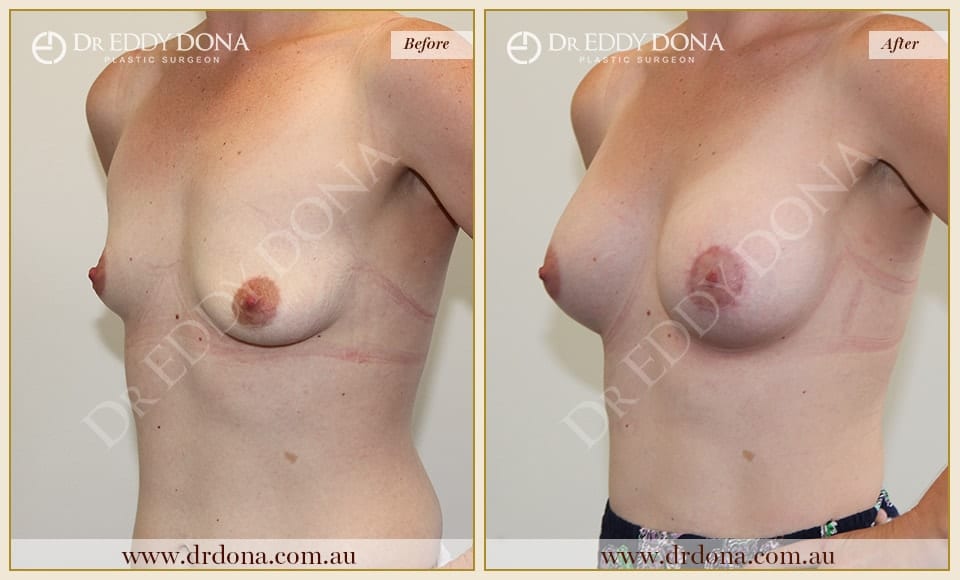
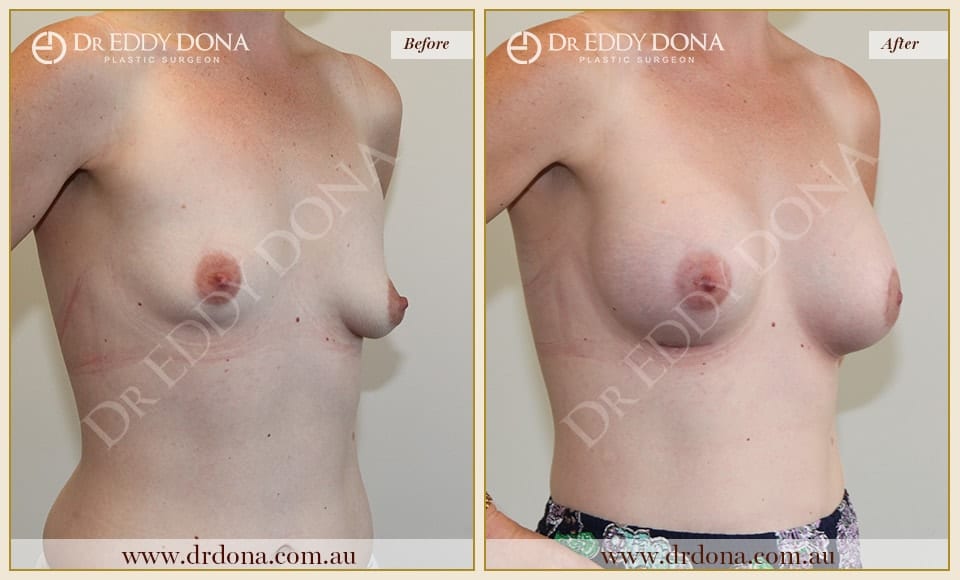
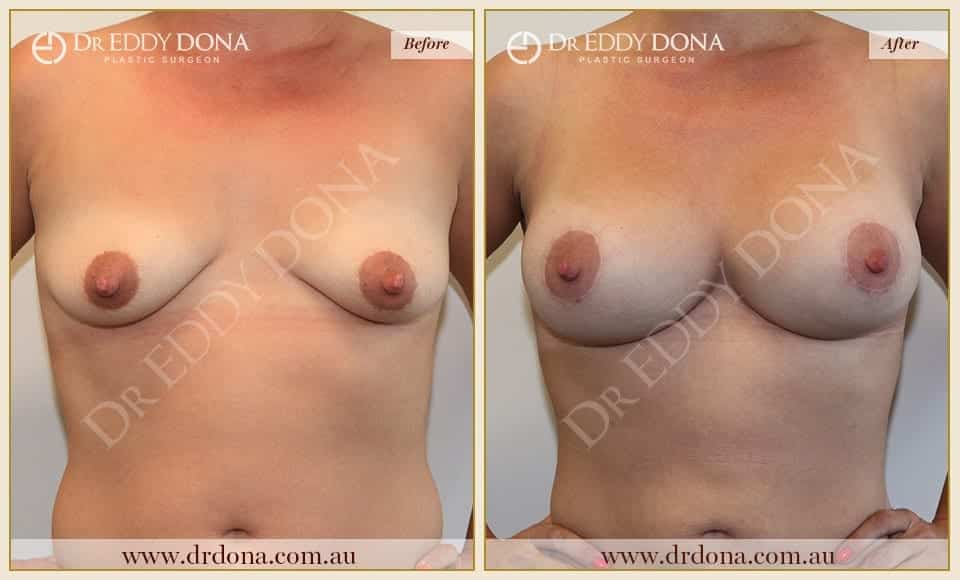
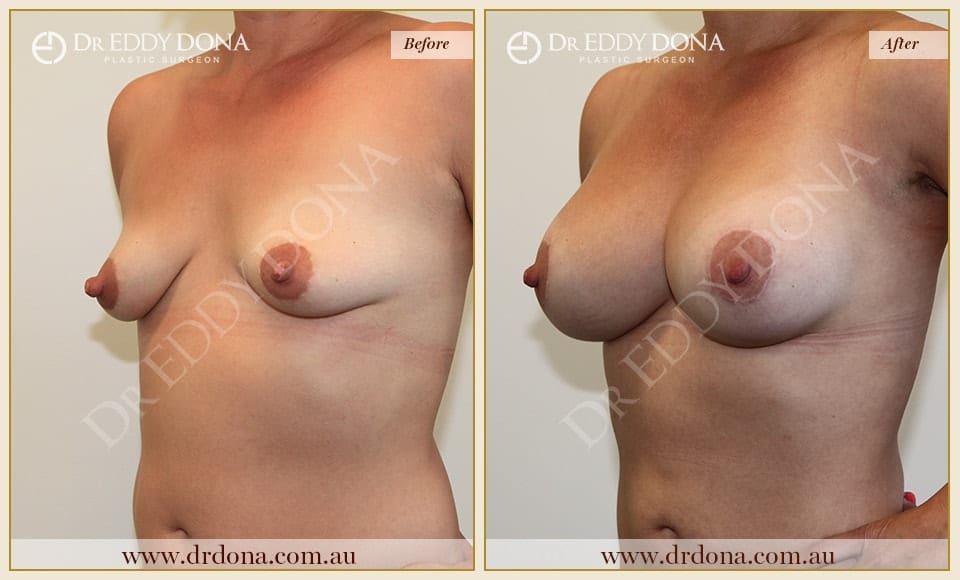
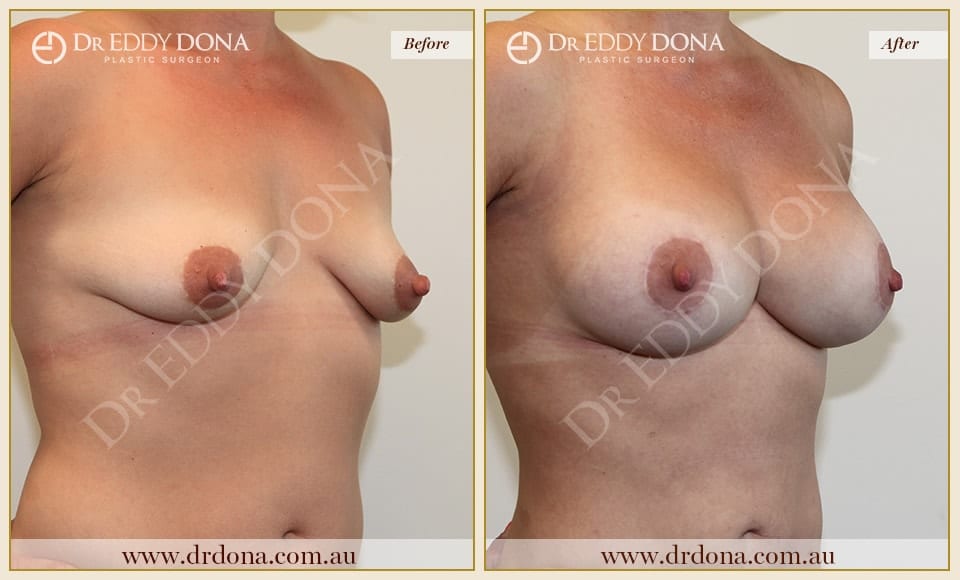
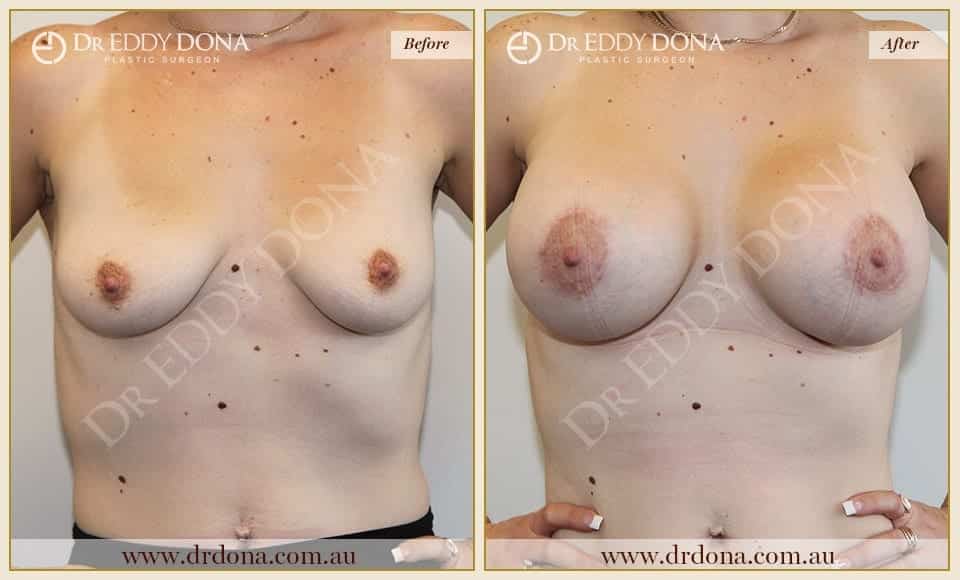
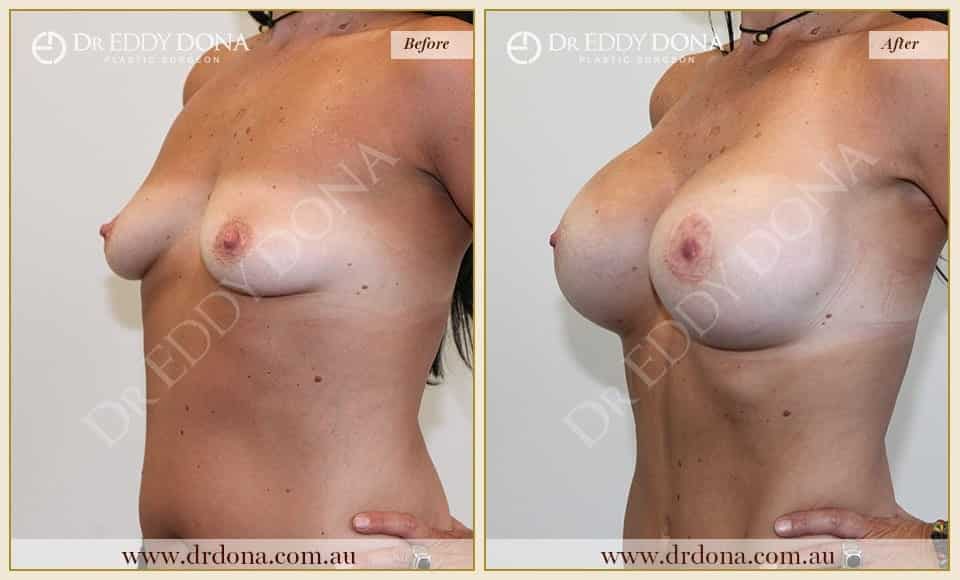
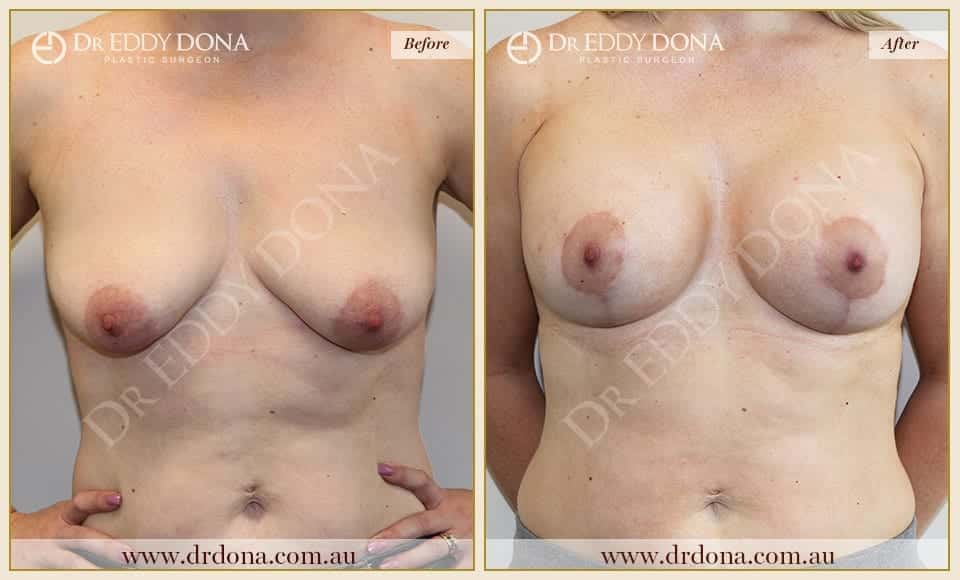
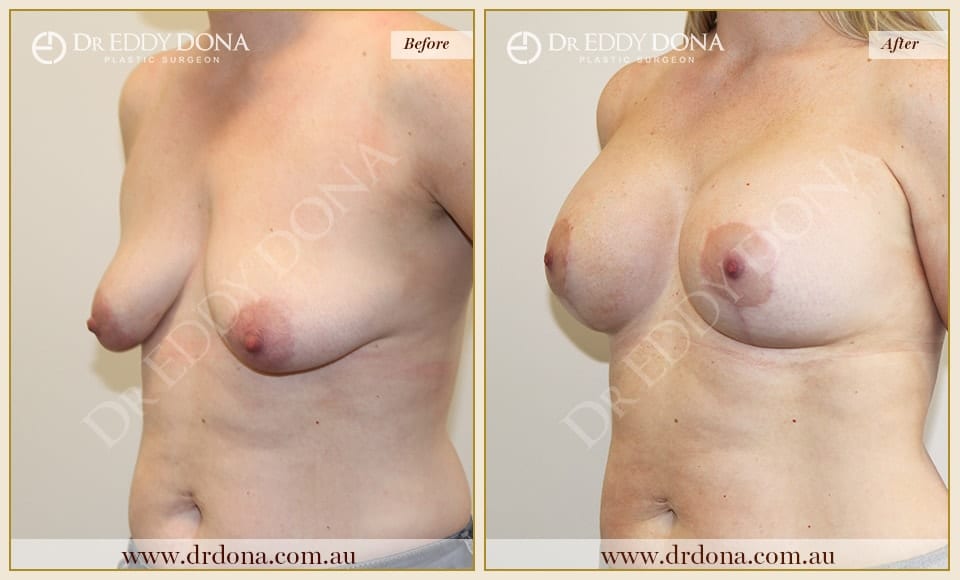
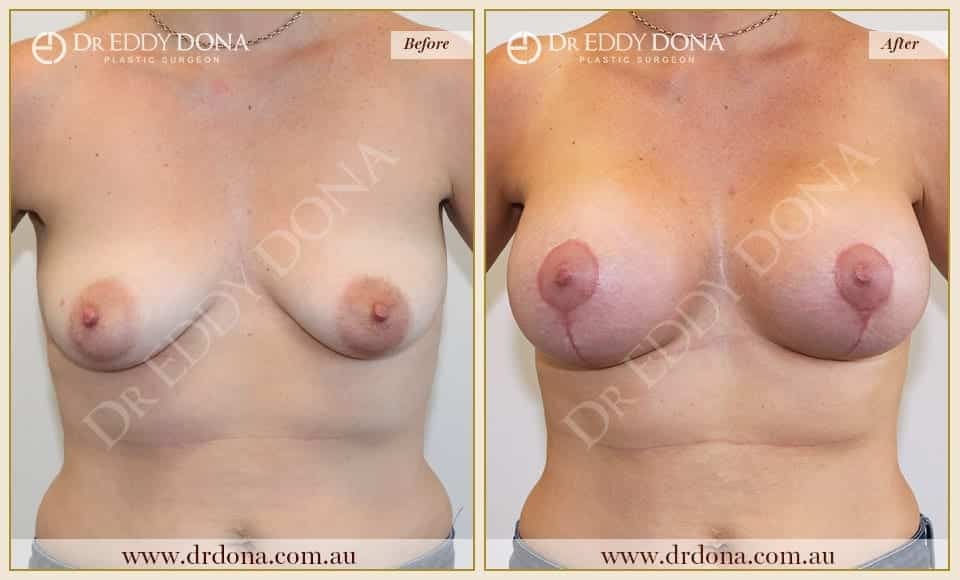
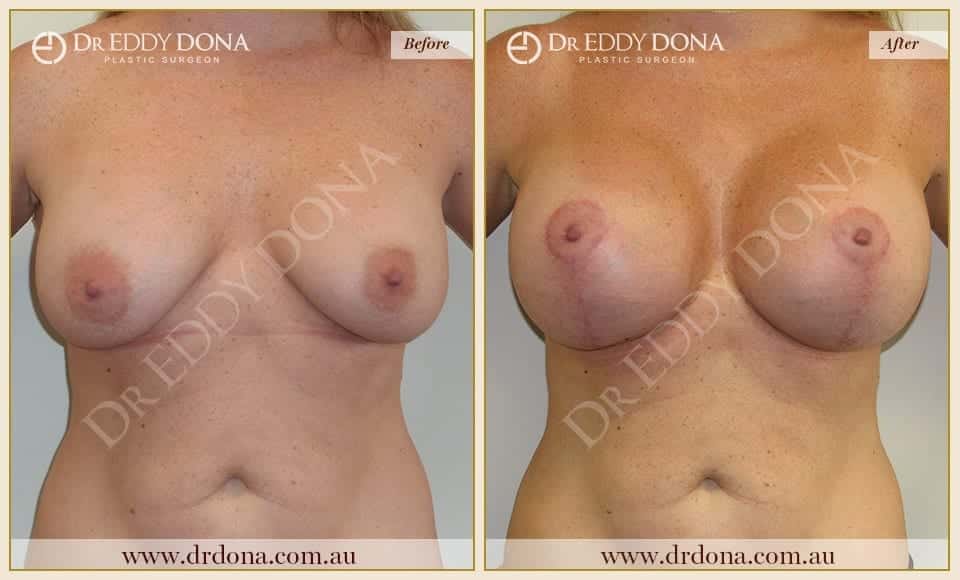
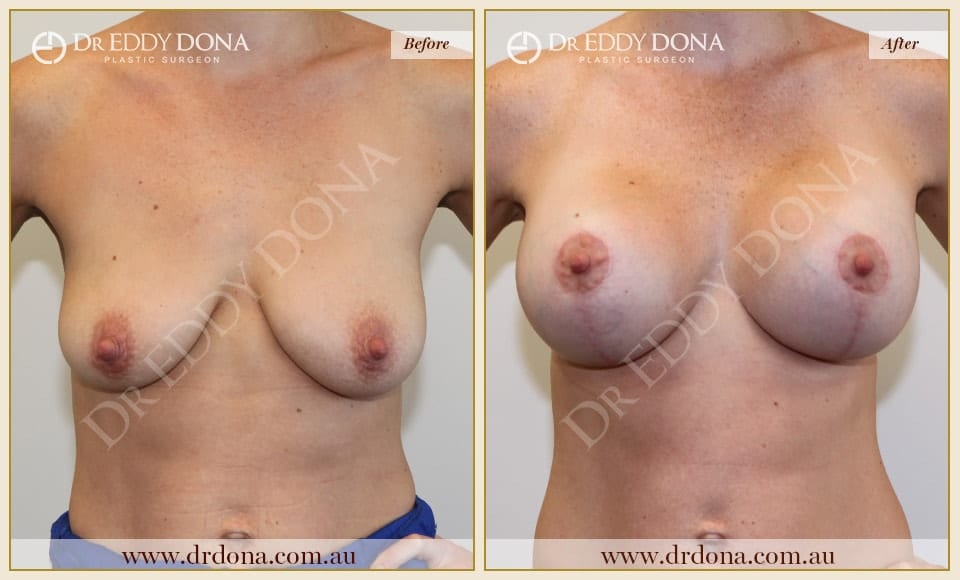
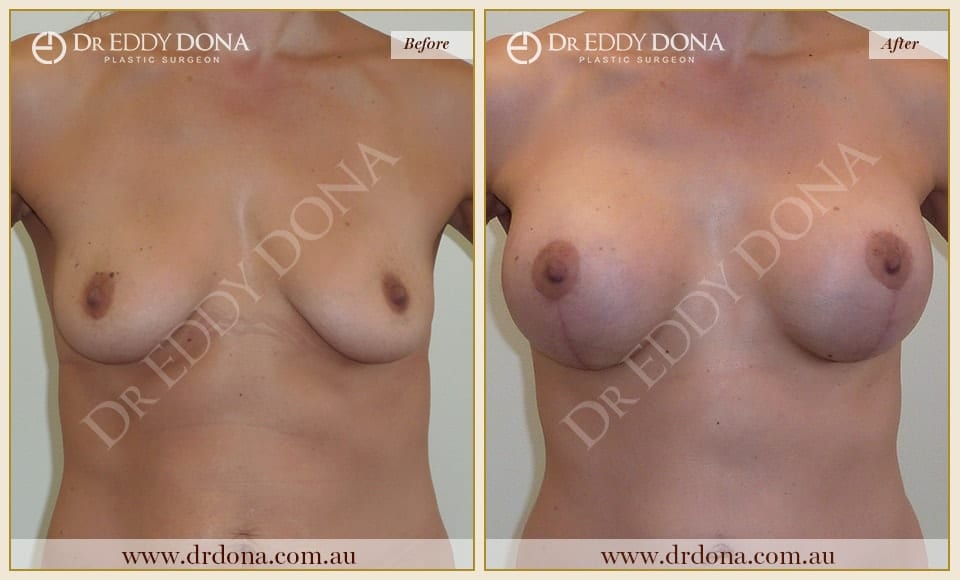
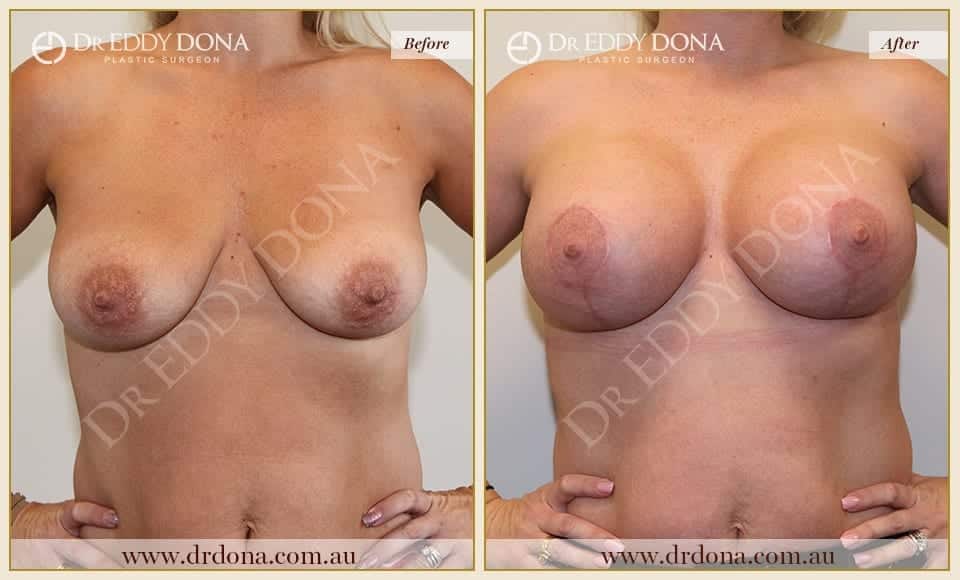
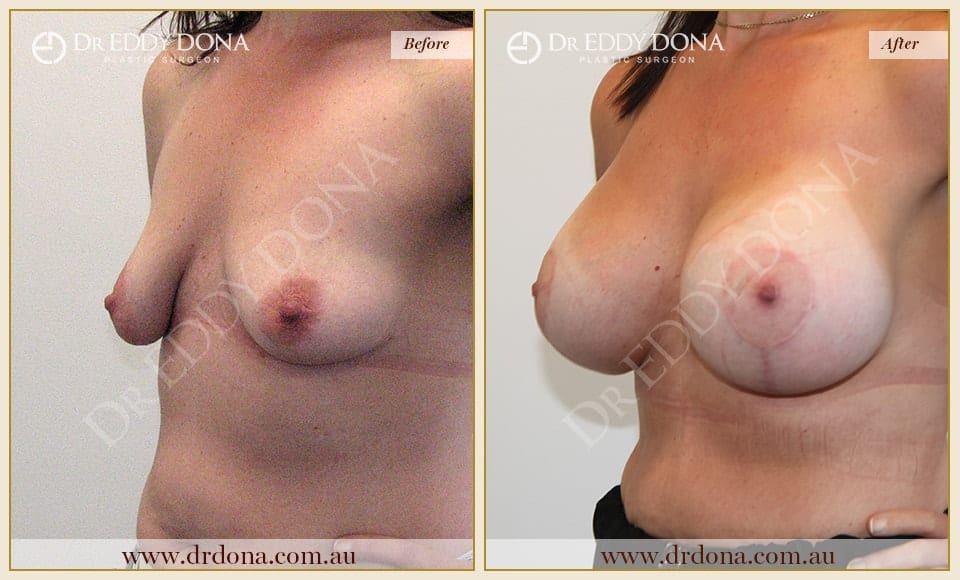
No Implants
22yo, 168cm, 57kg, 0 Children


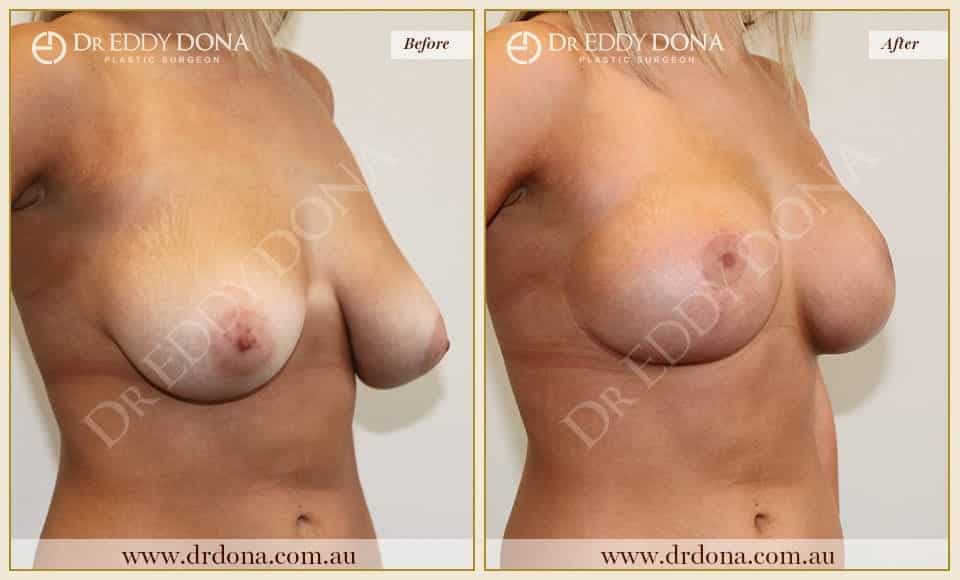
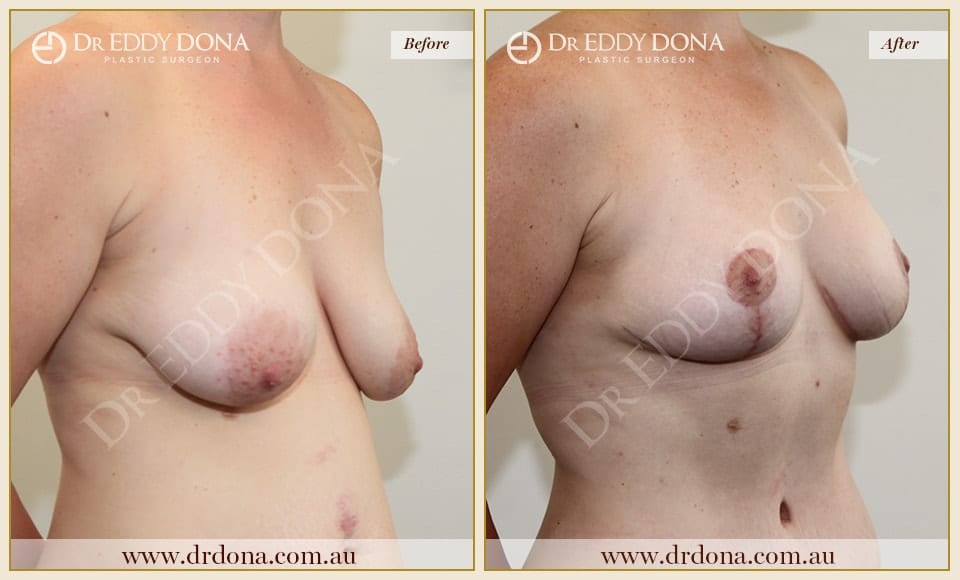
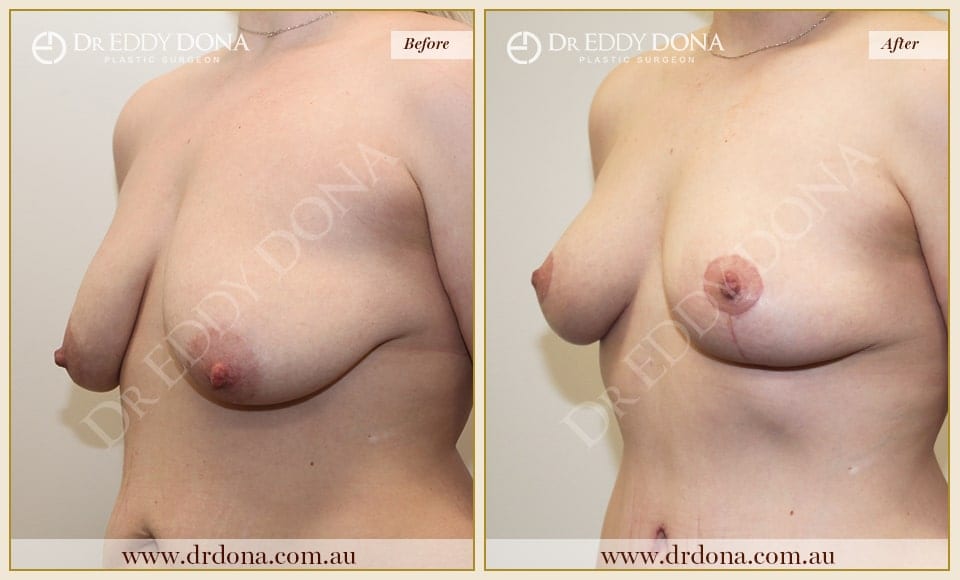
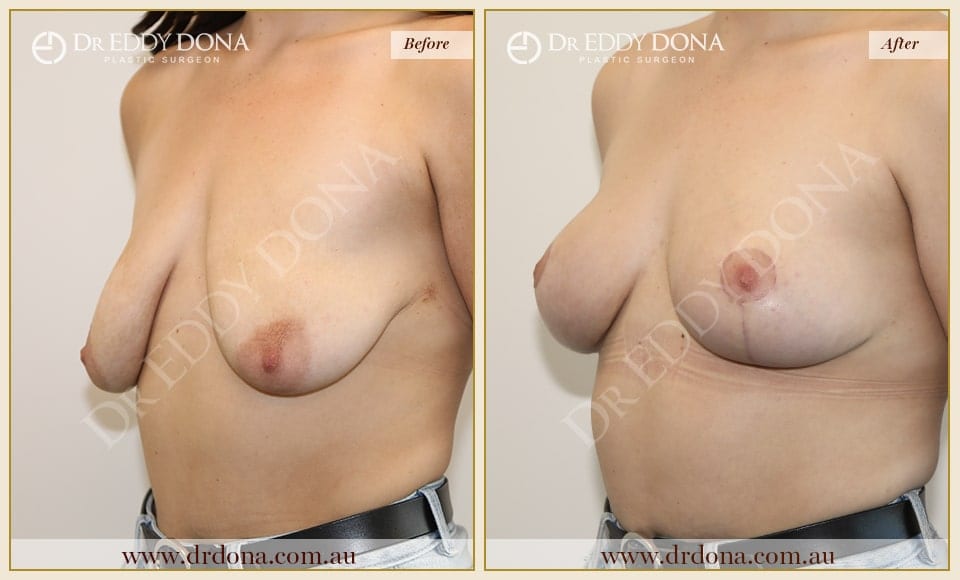
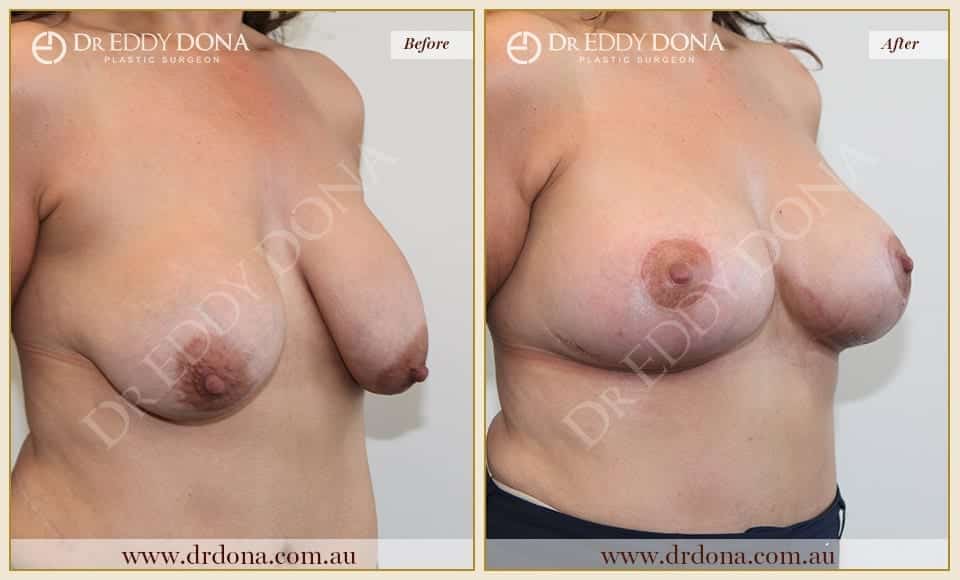
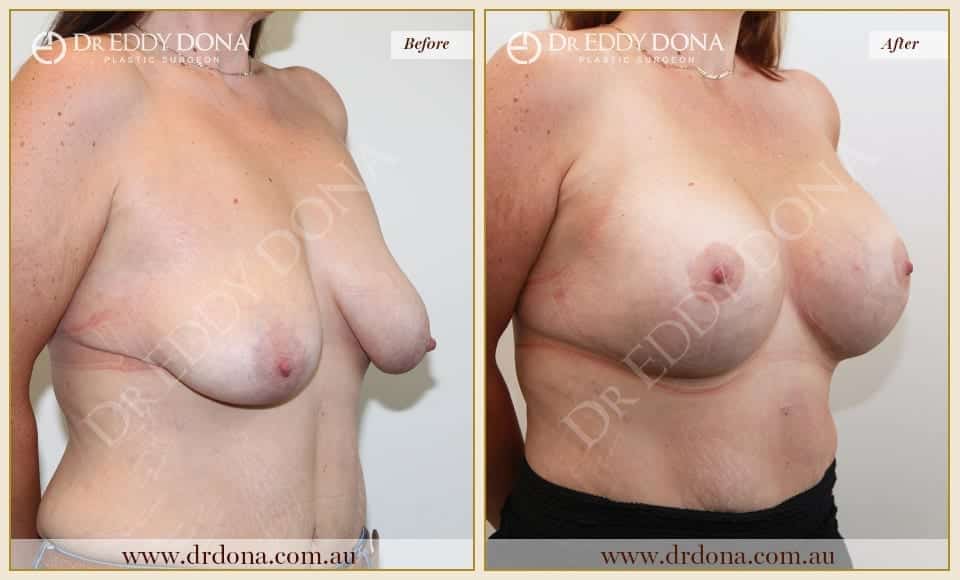
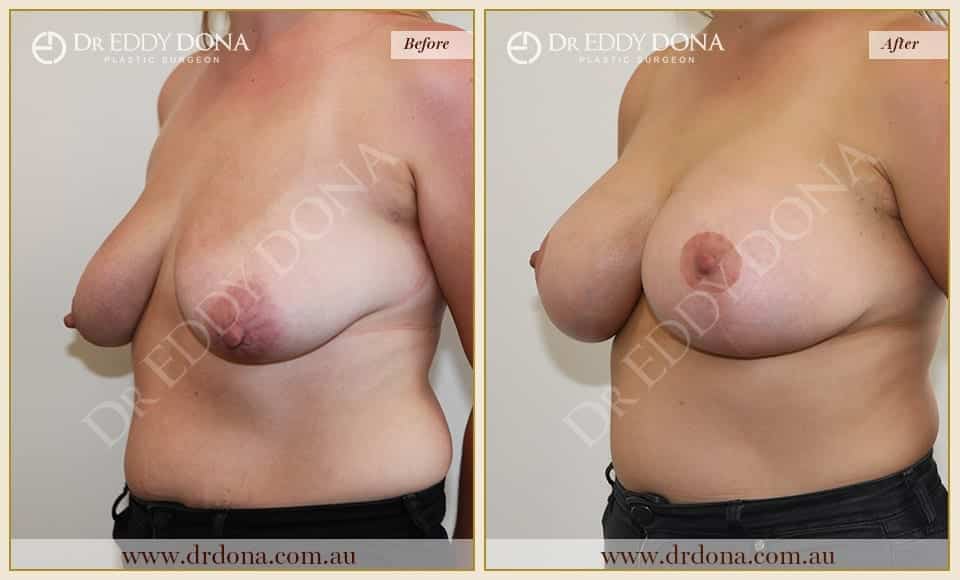
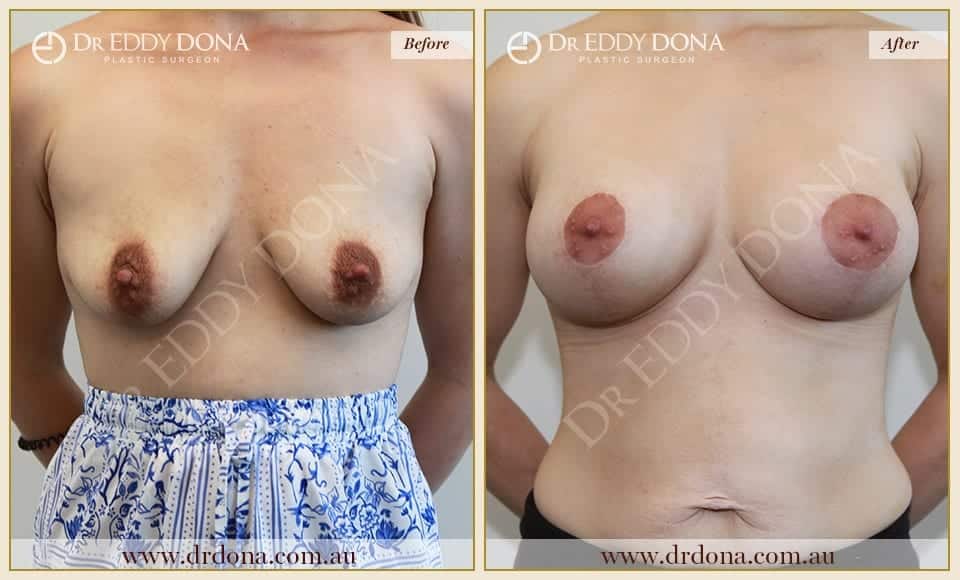
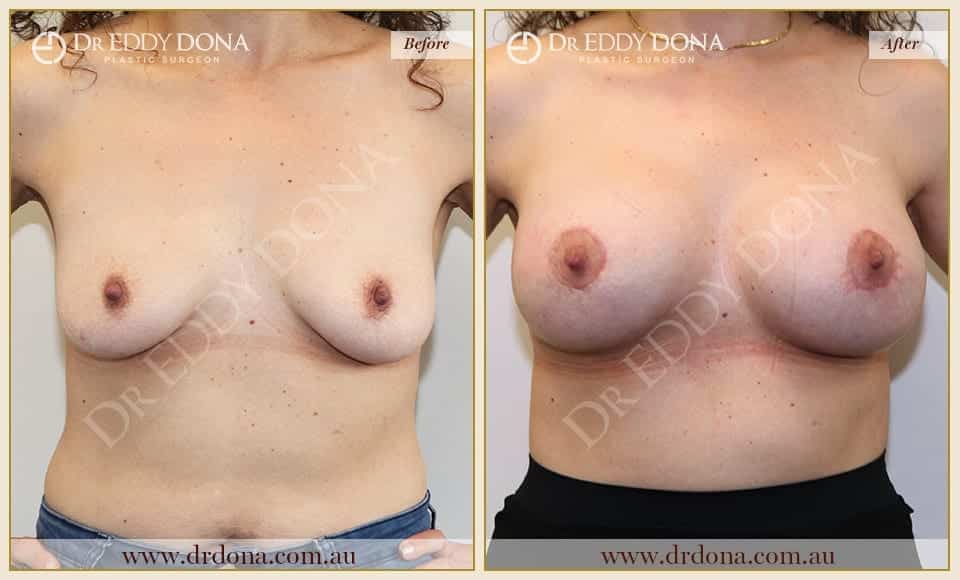
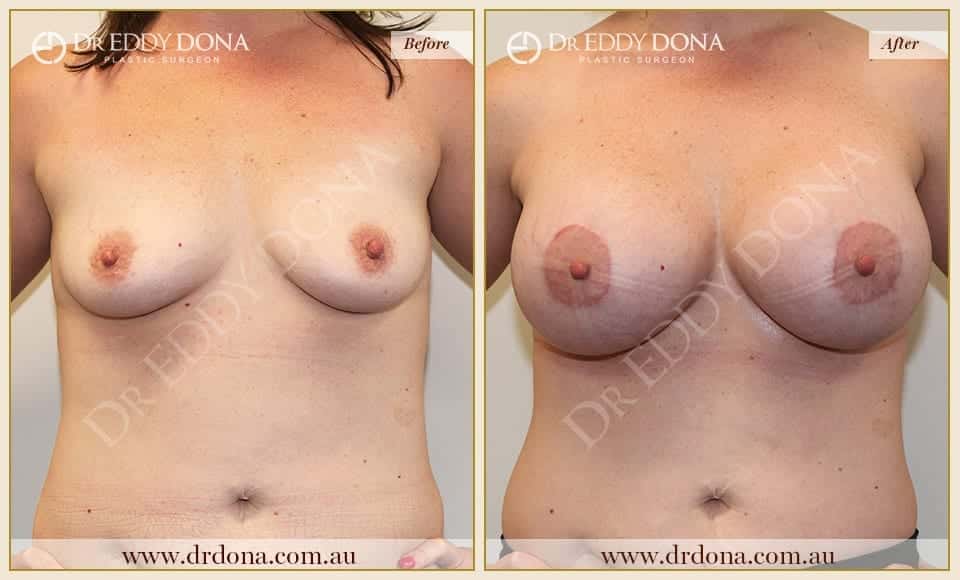
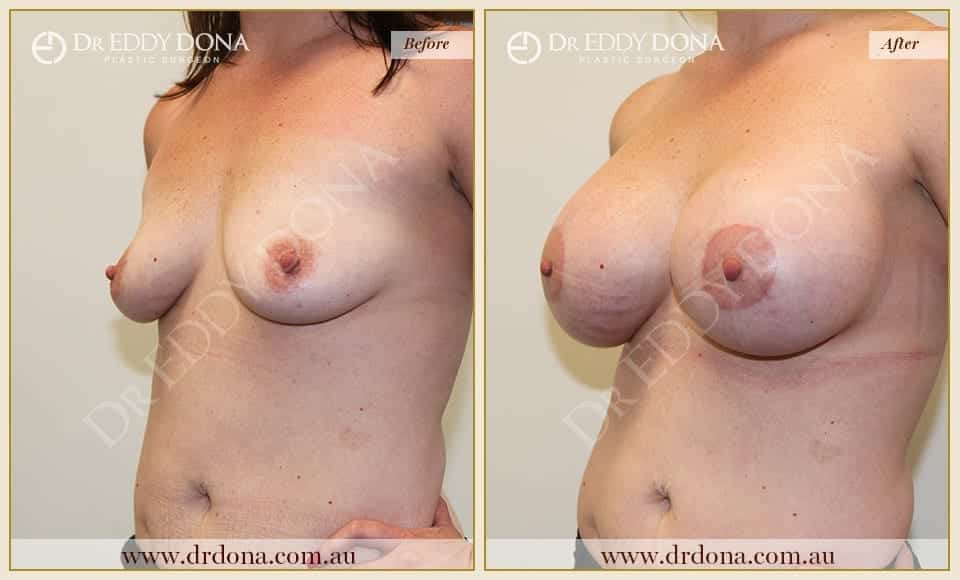
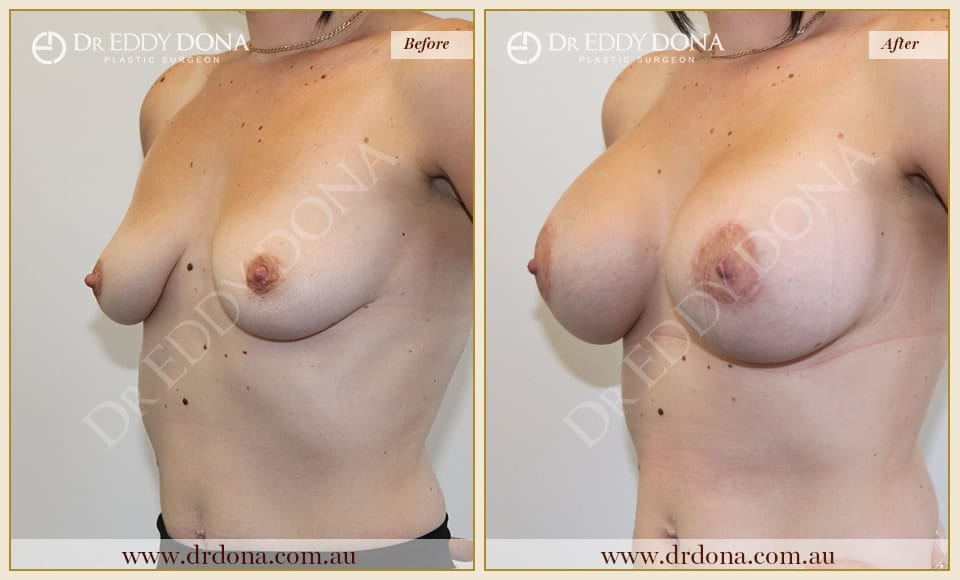
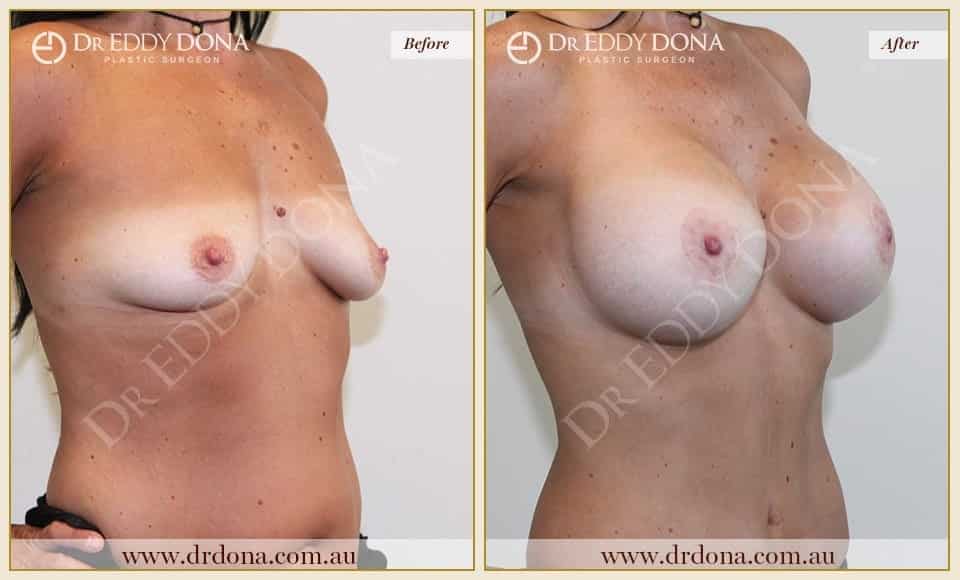
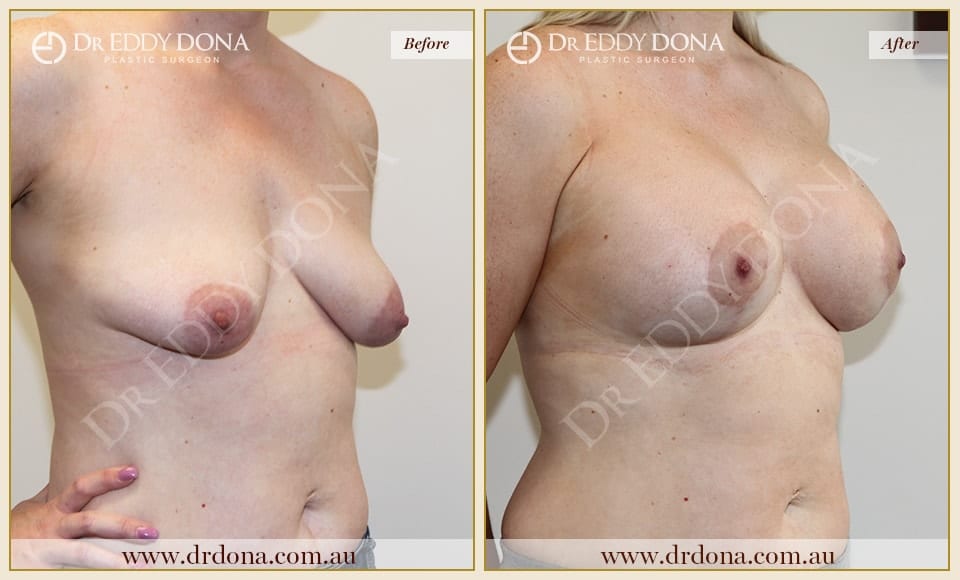
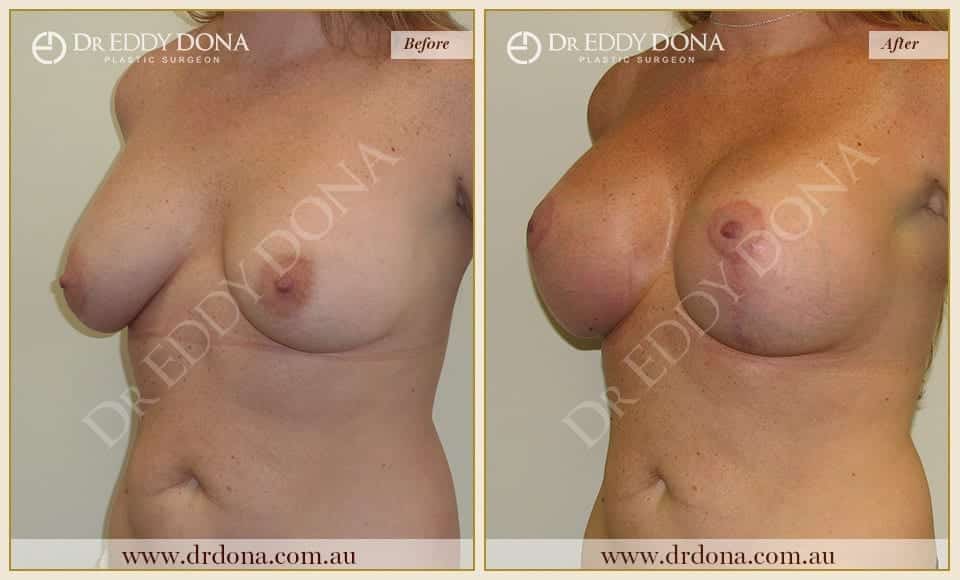
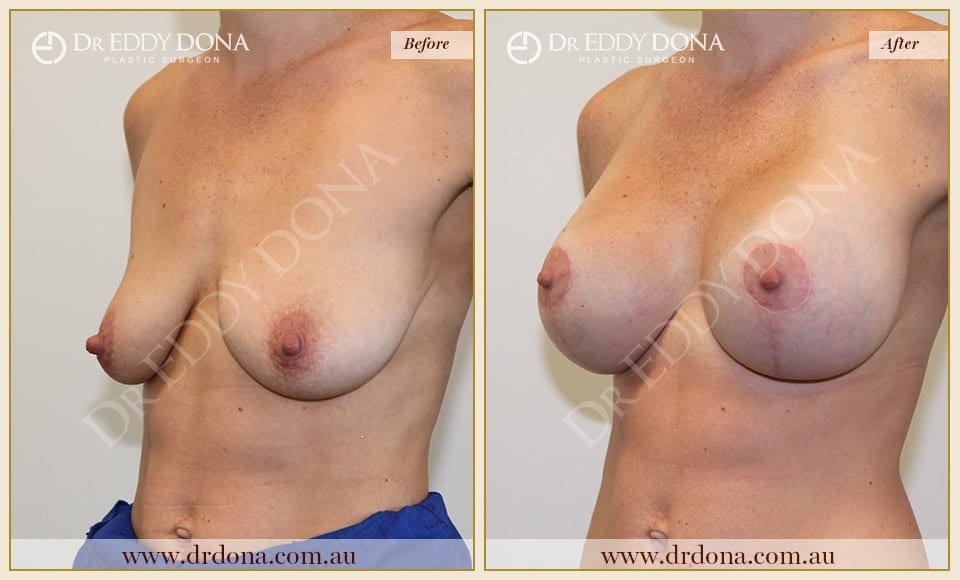
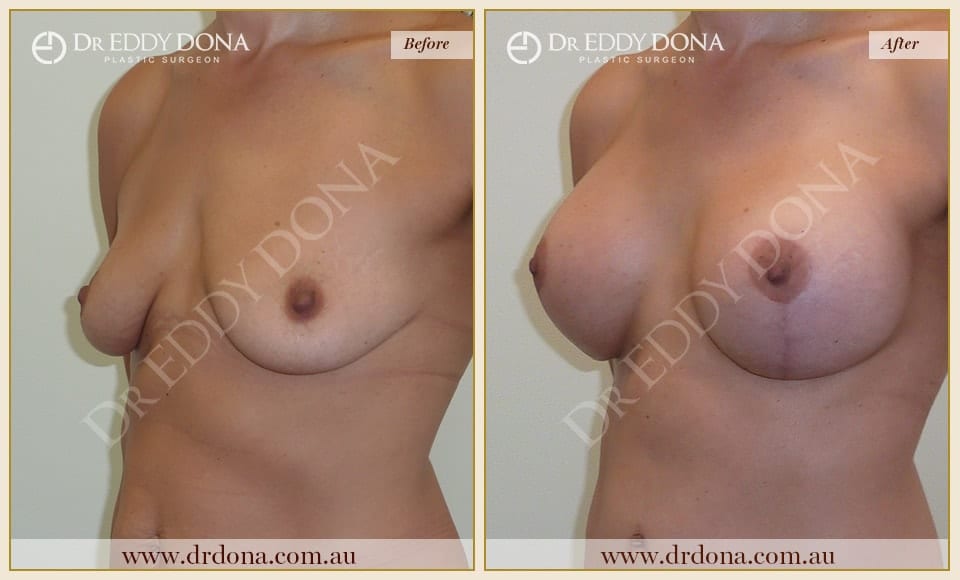
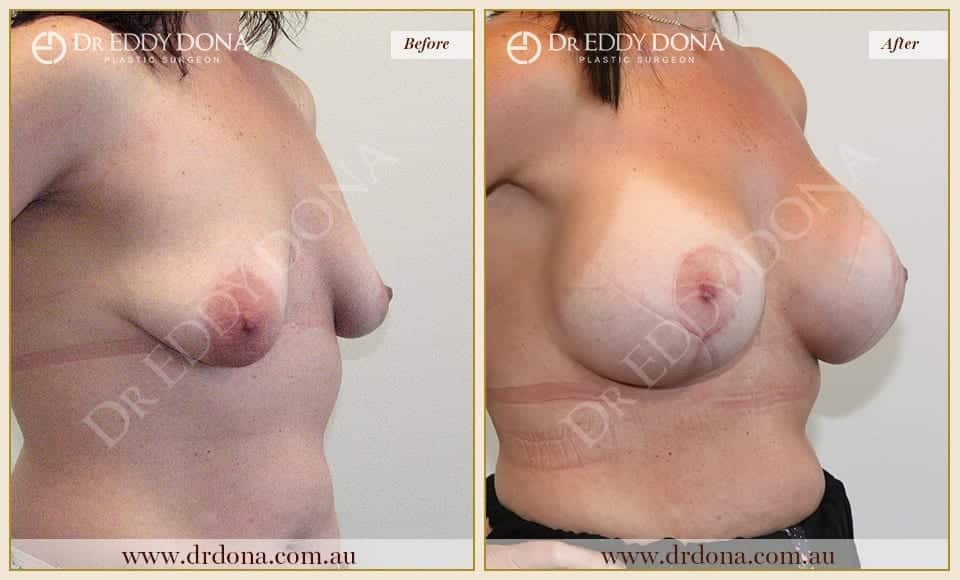
No Implants
44yo, 157cm, 75kg, 2 Children


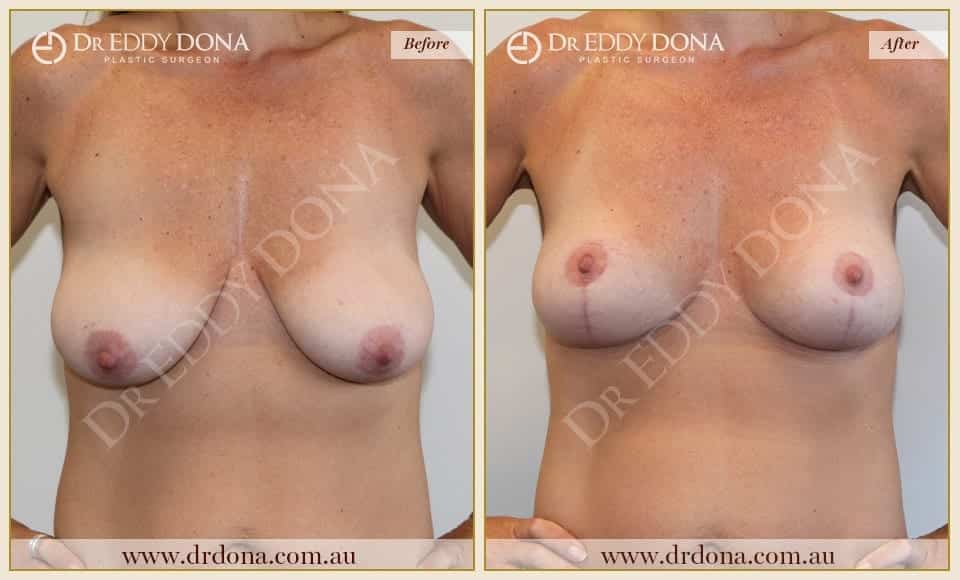
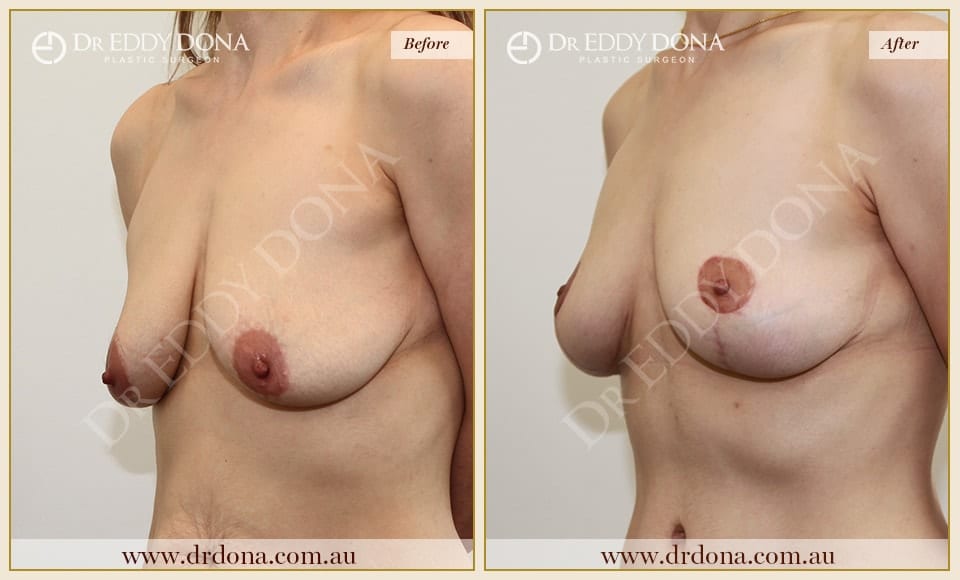
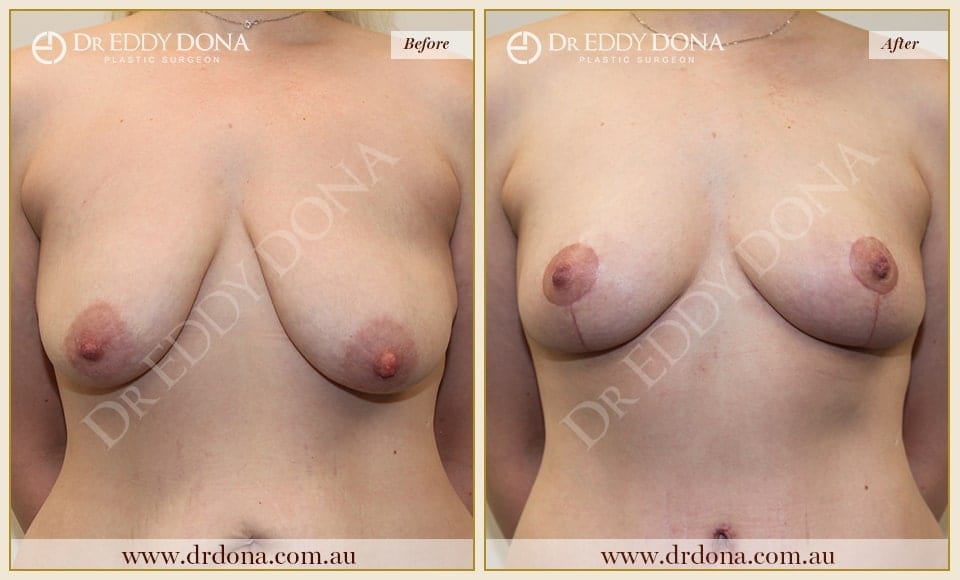
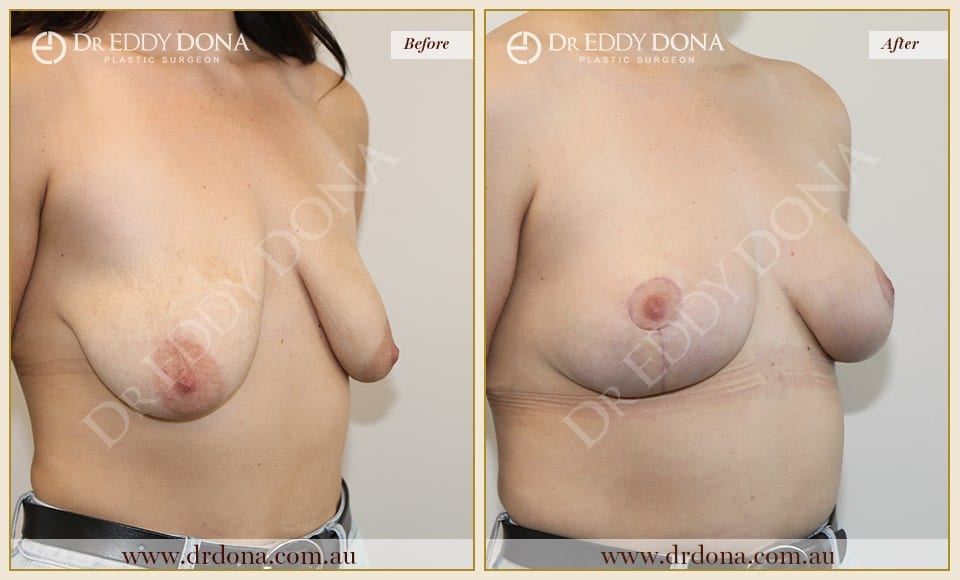
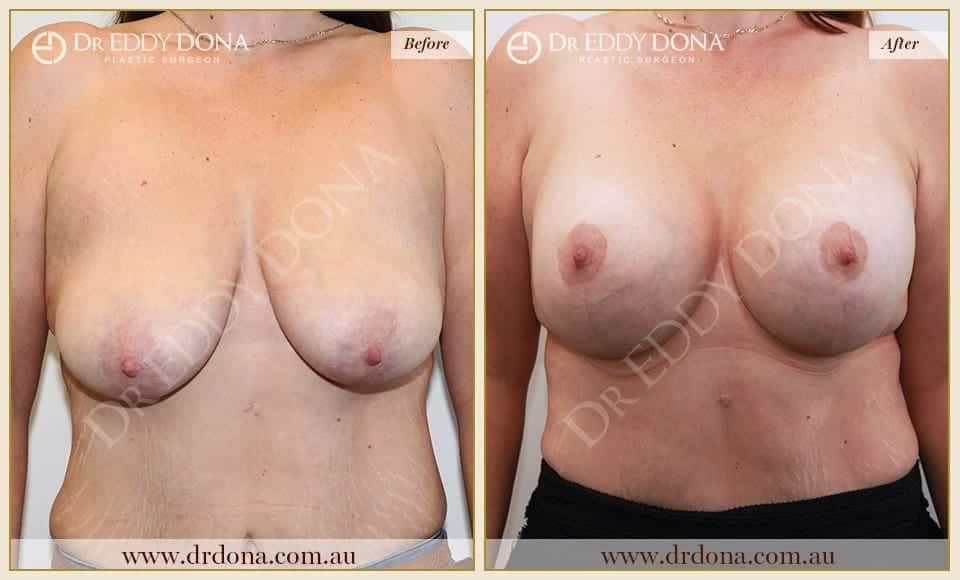
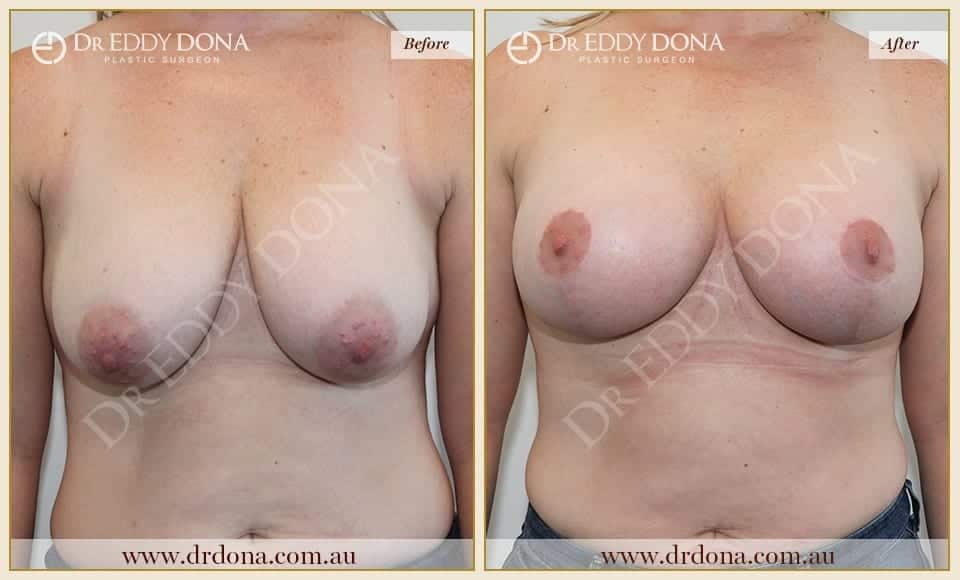
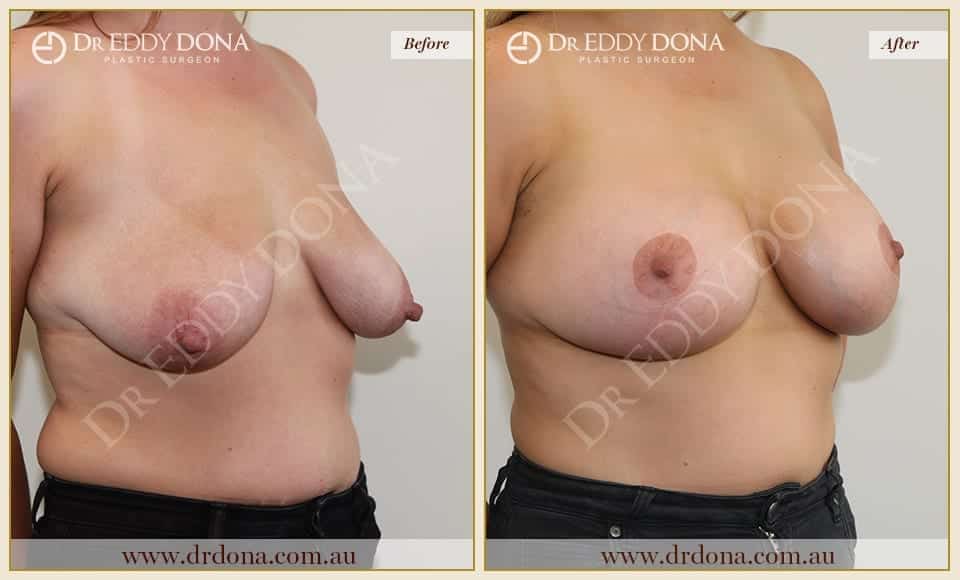
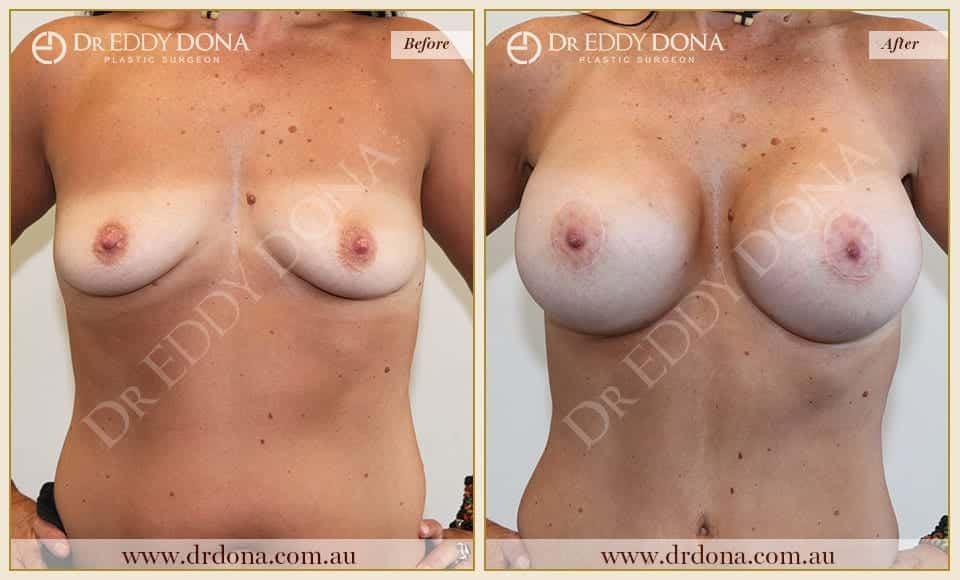
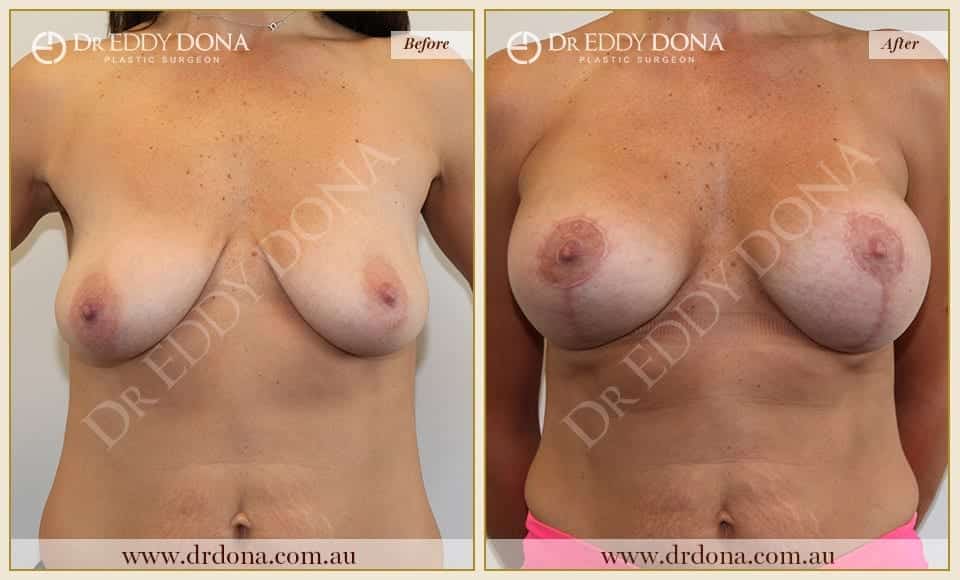
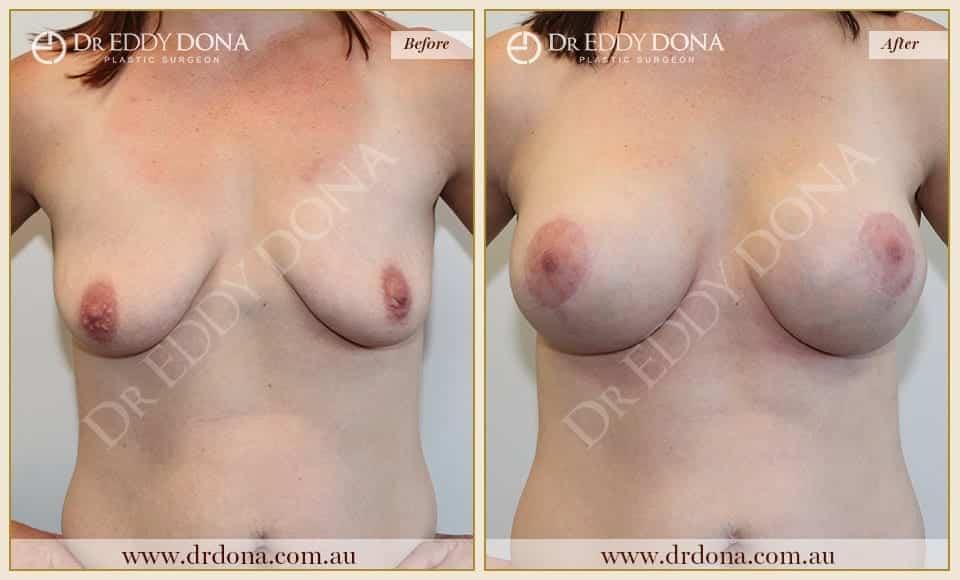
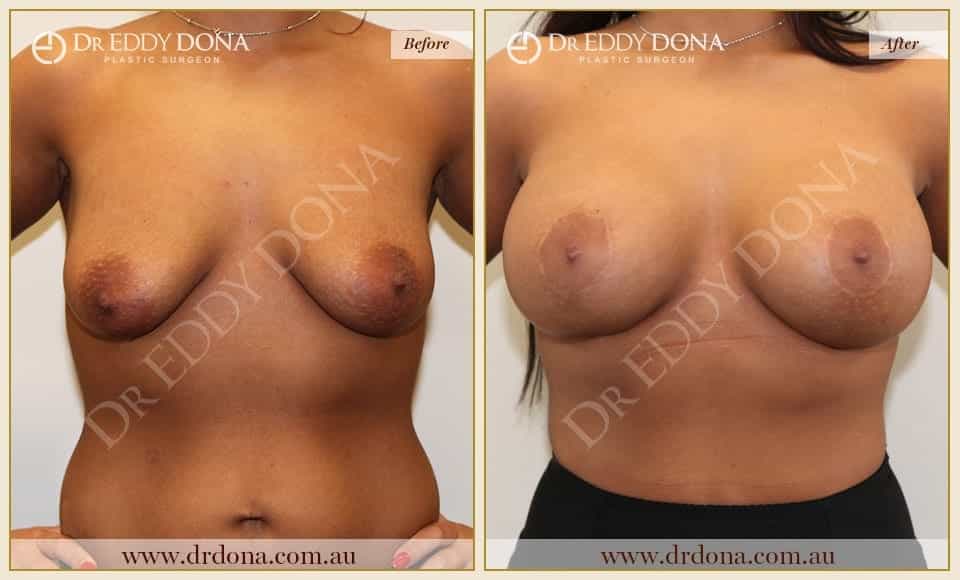
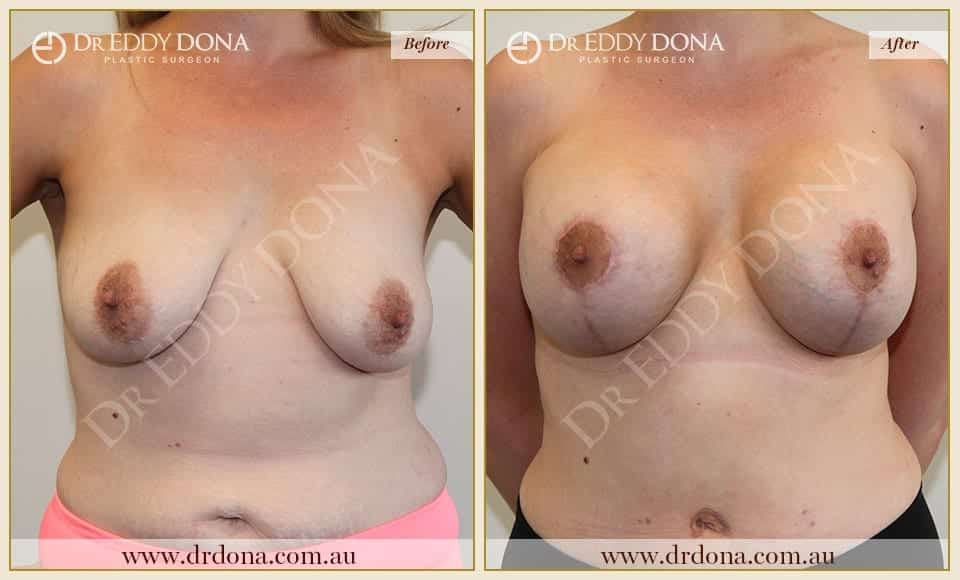
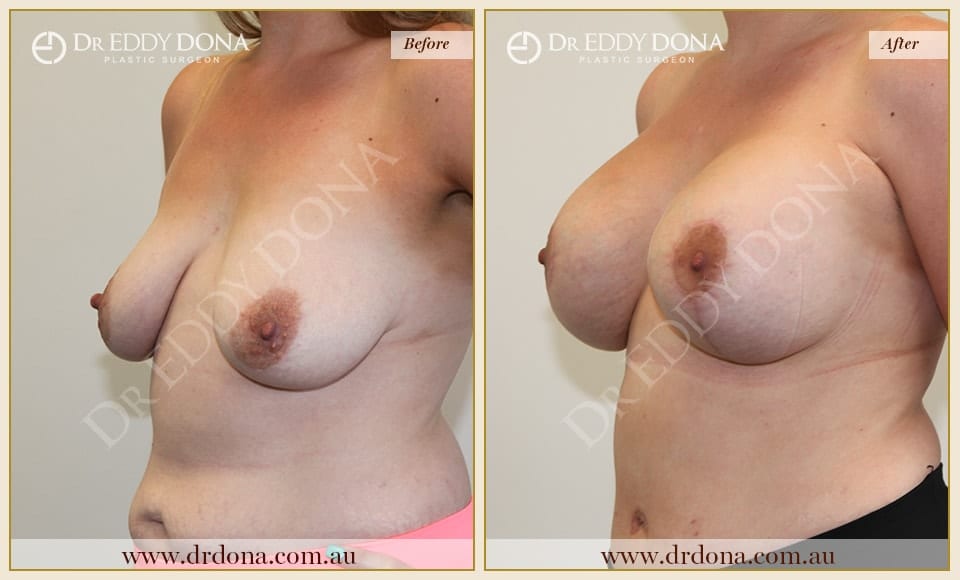
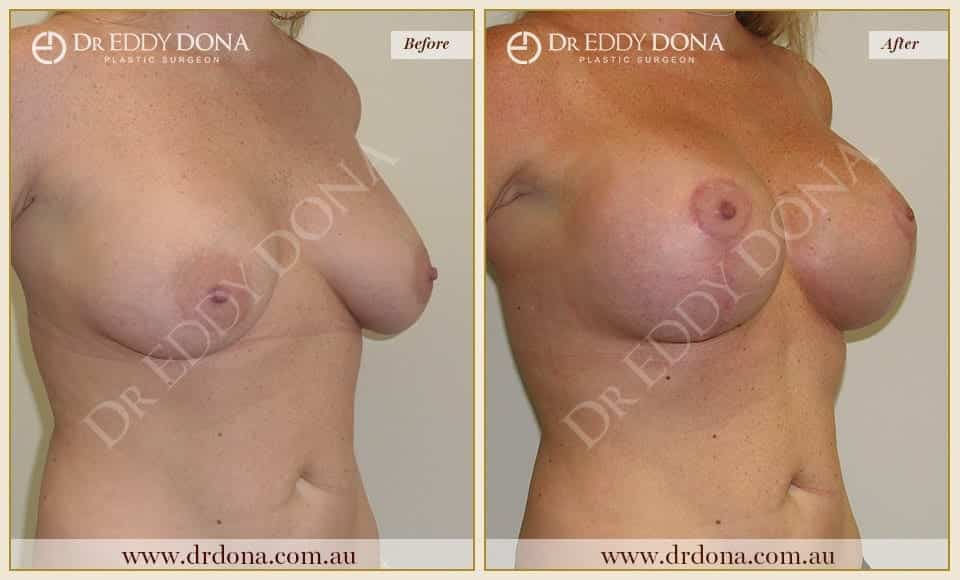
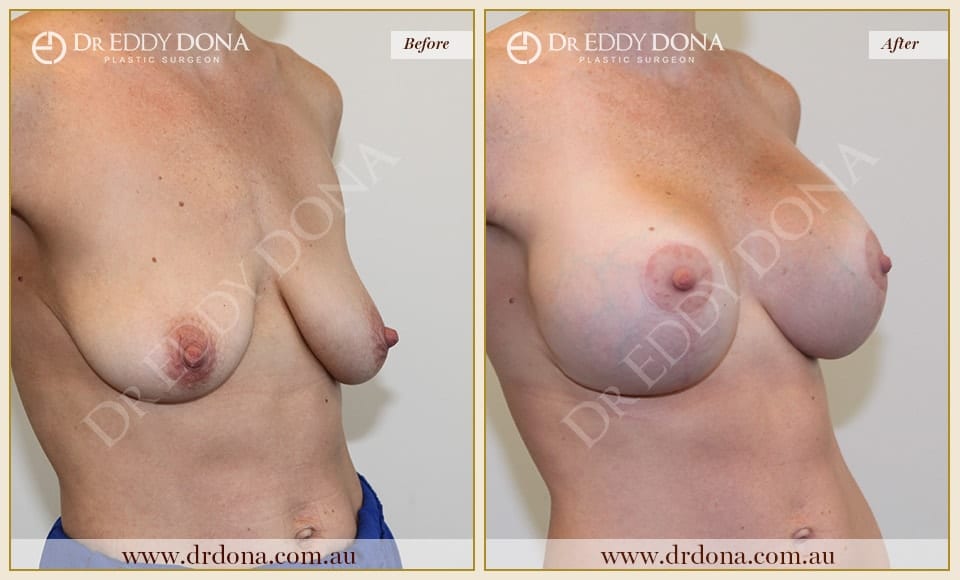
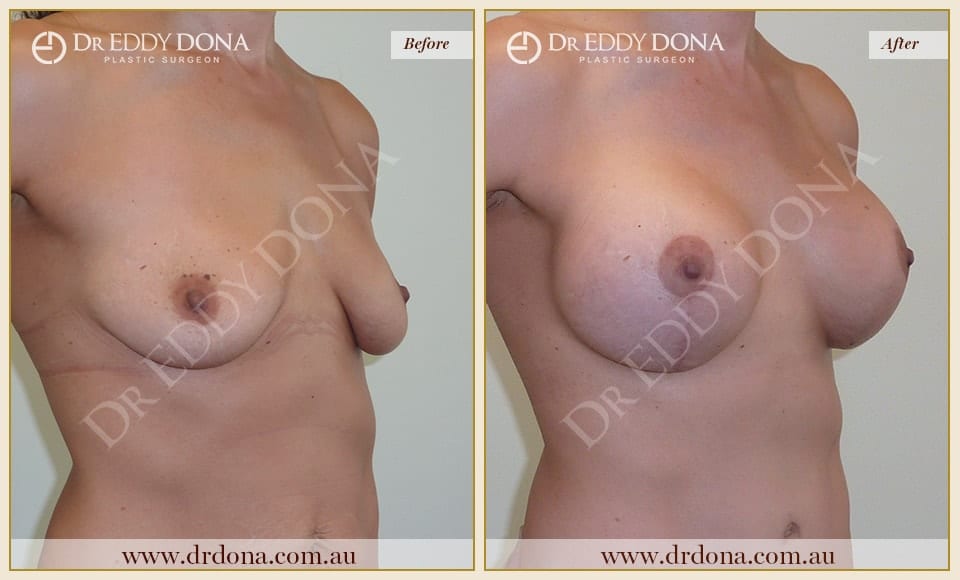
No Implants
39yo, 175cm, 69kg, 4 Children


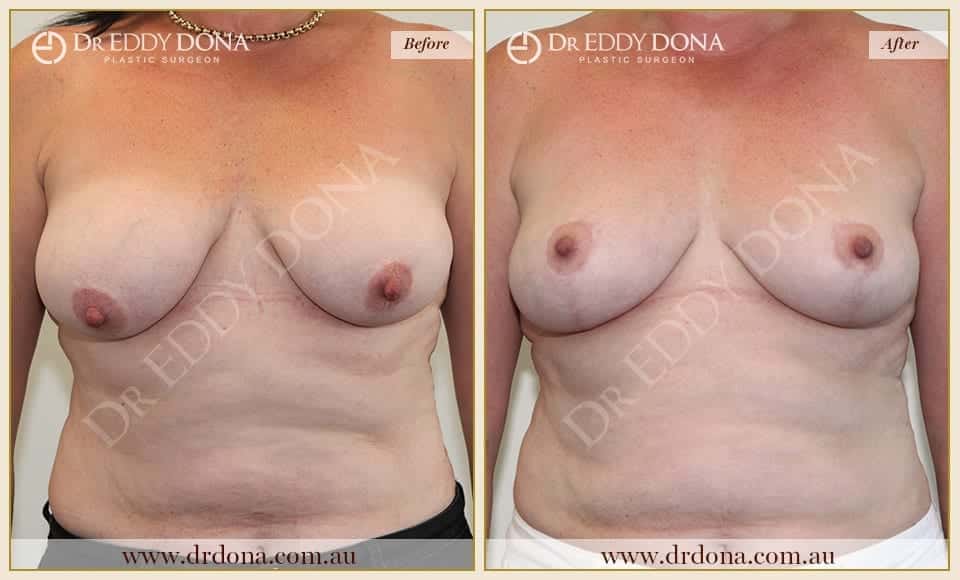


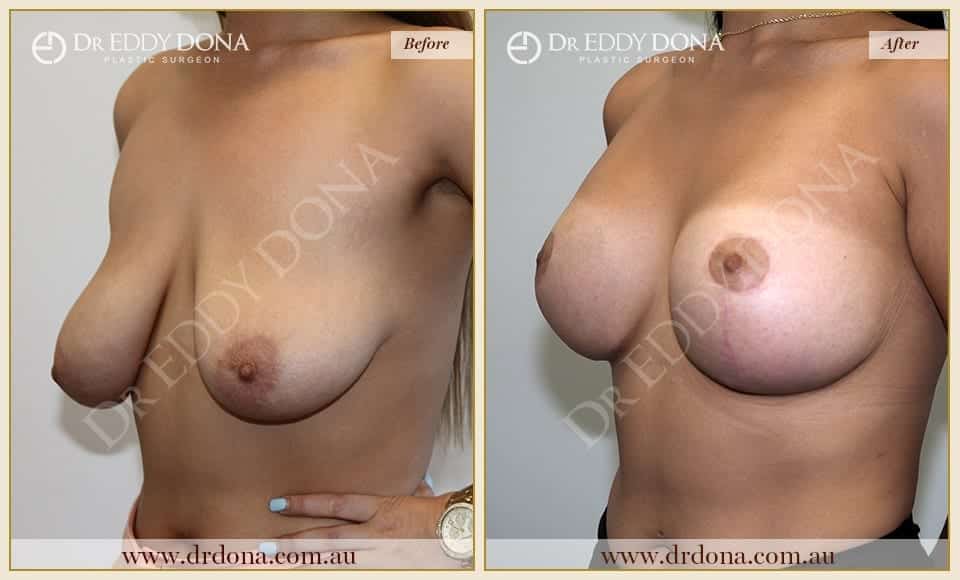
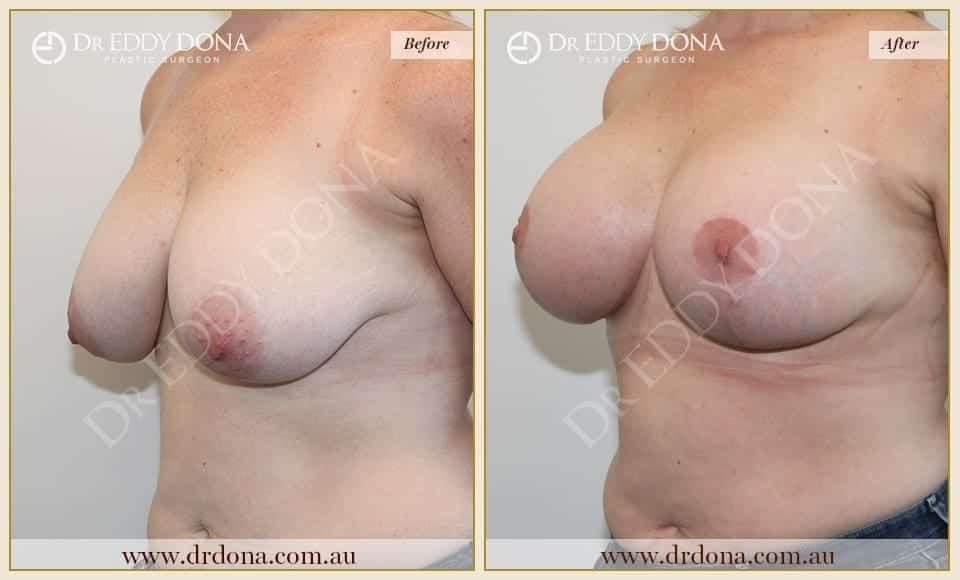
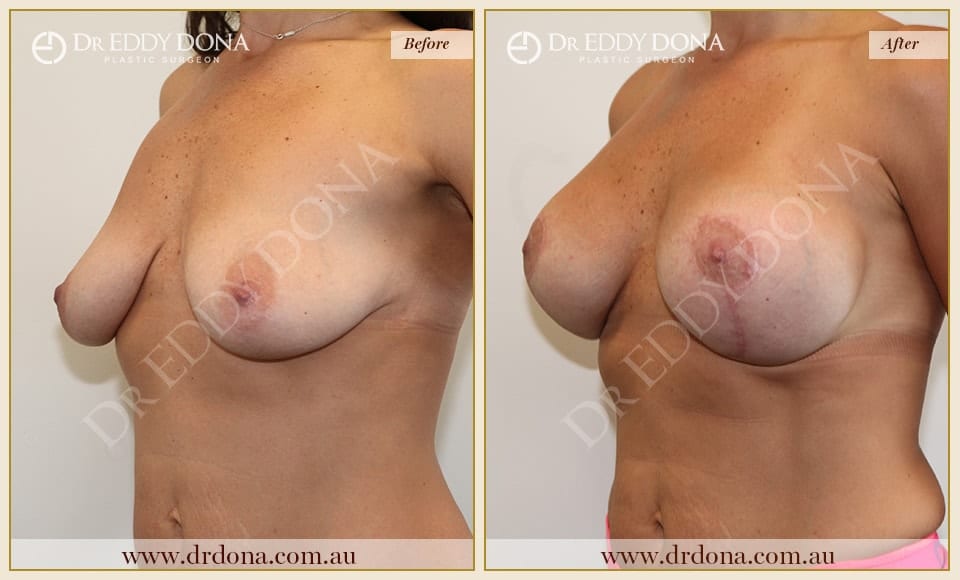
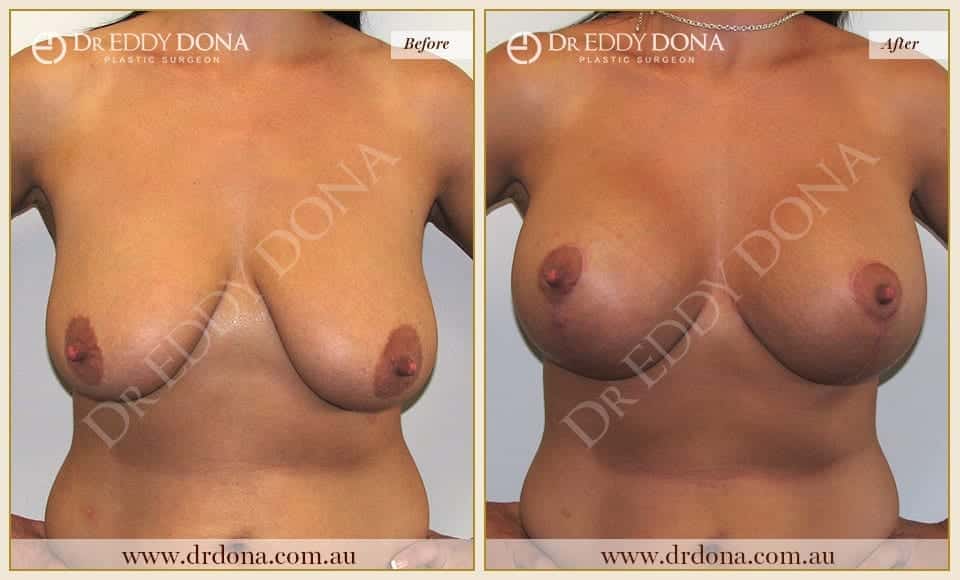
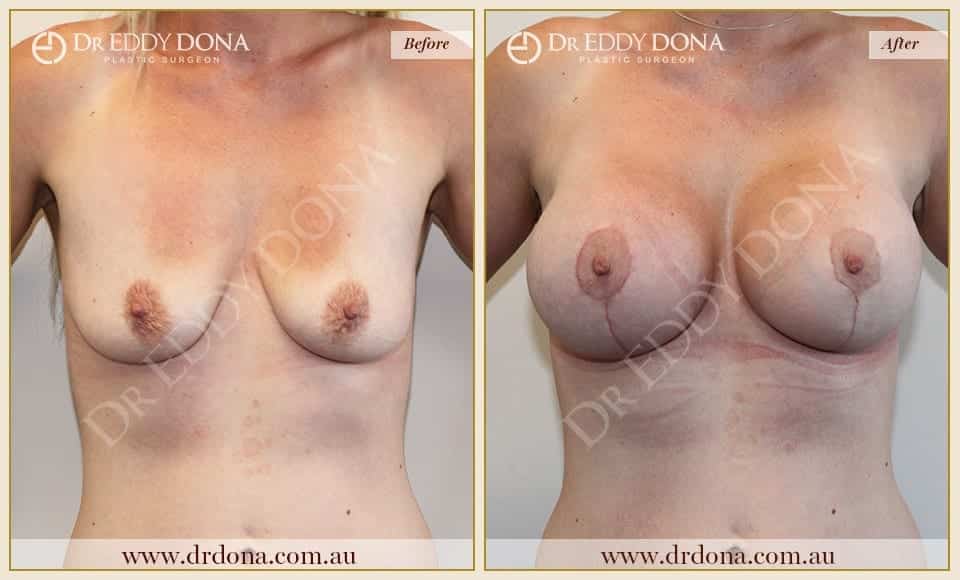
No Implants
43yo, 160cm, 80kg, 2 Children
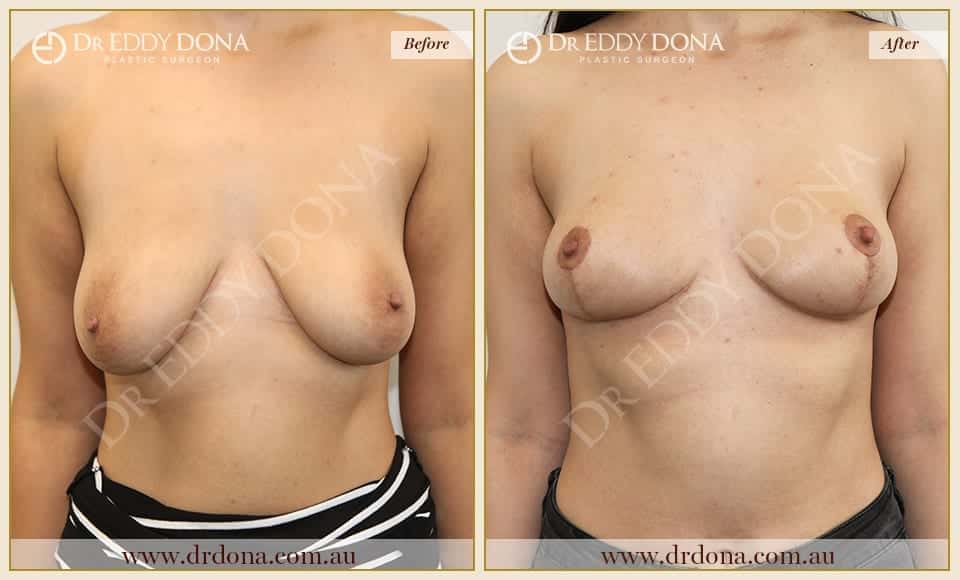


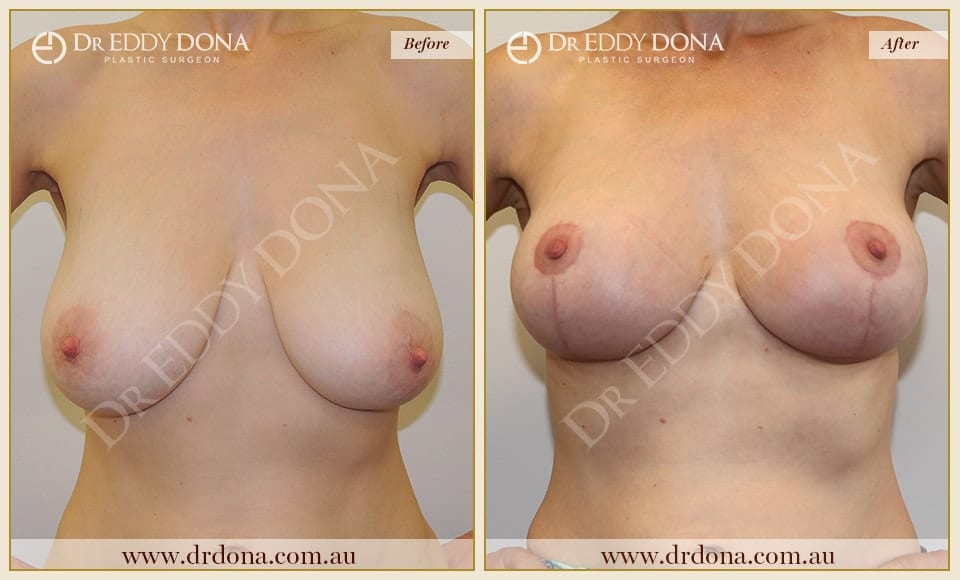
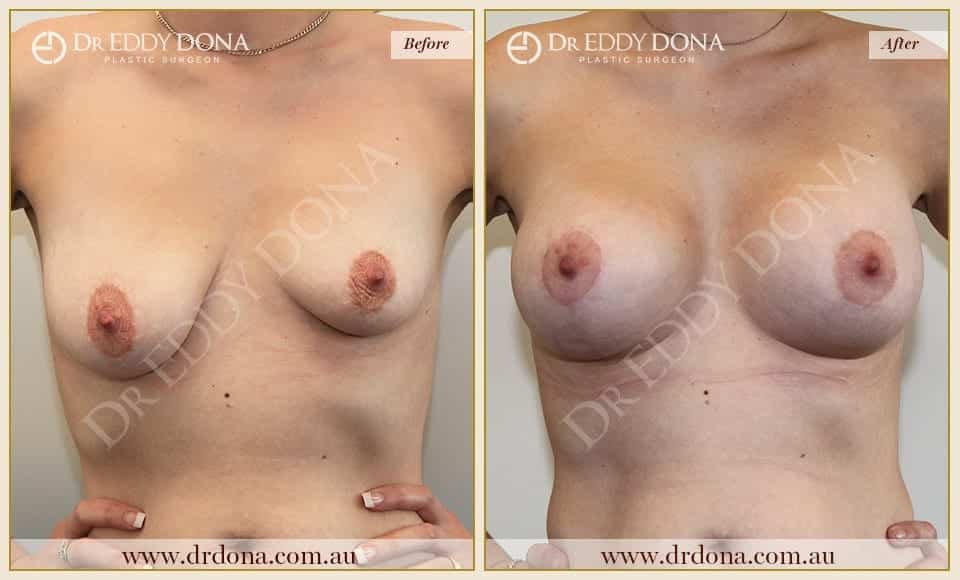
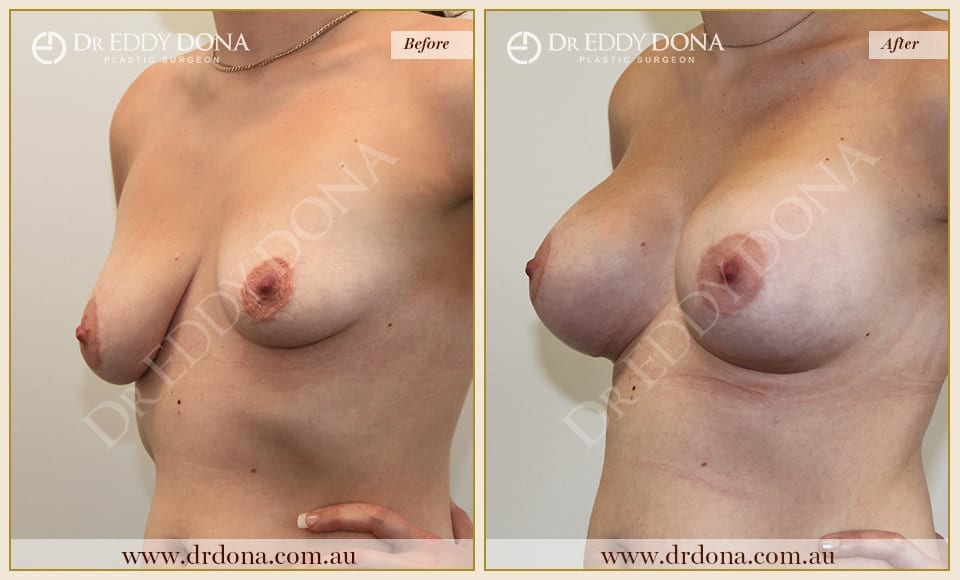
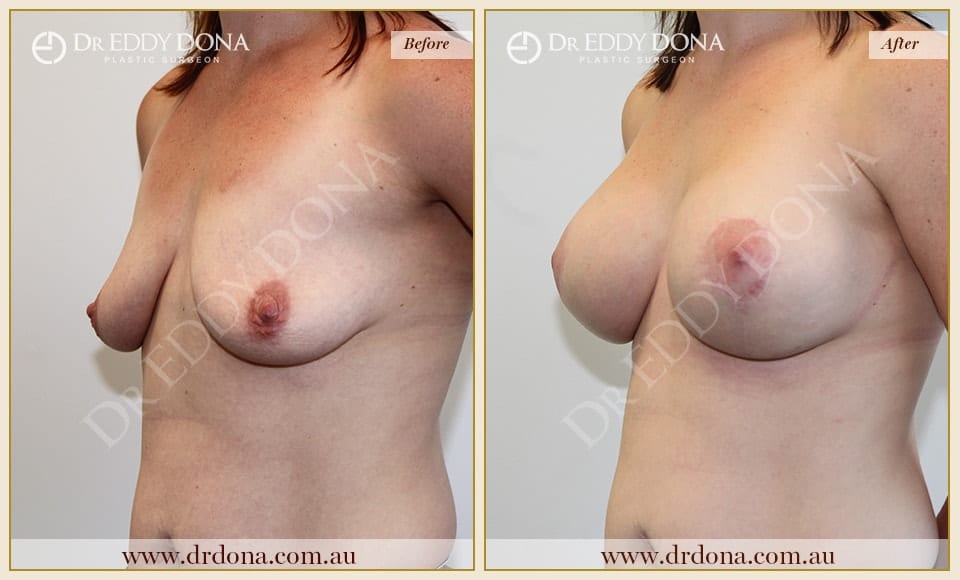
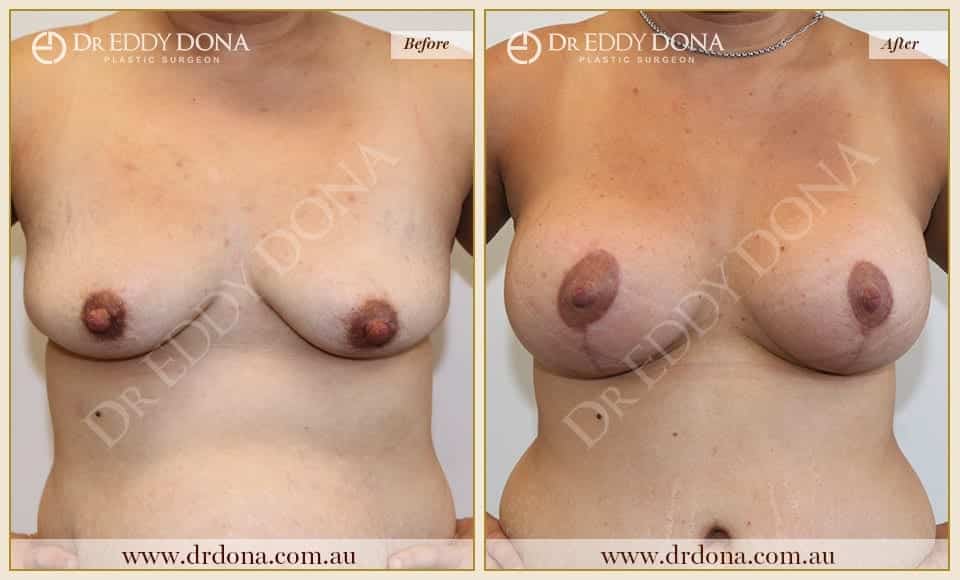
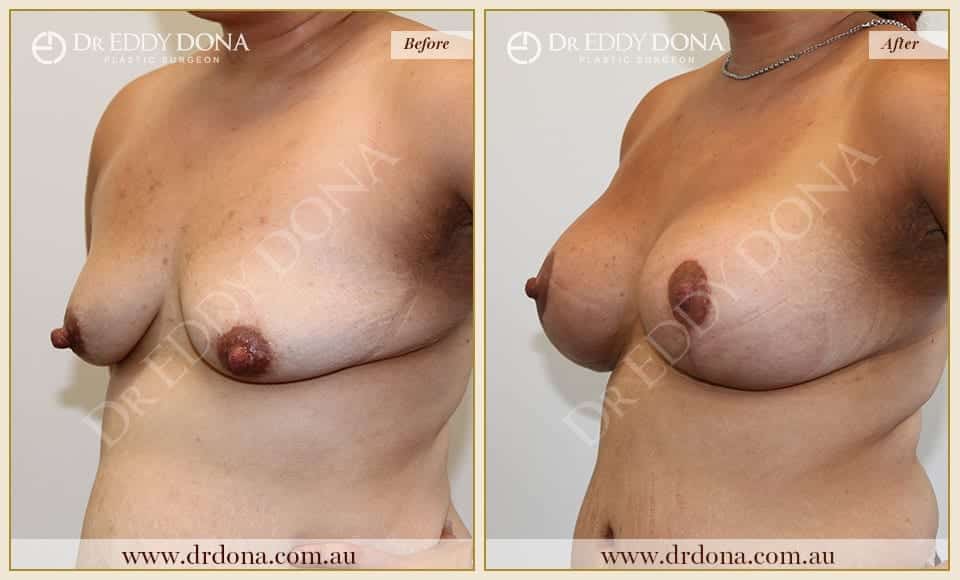
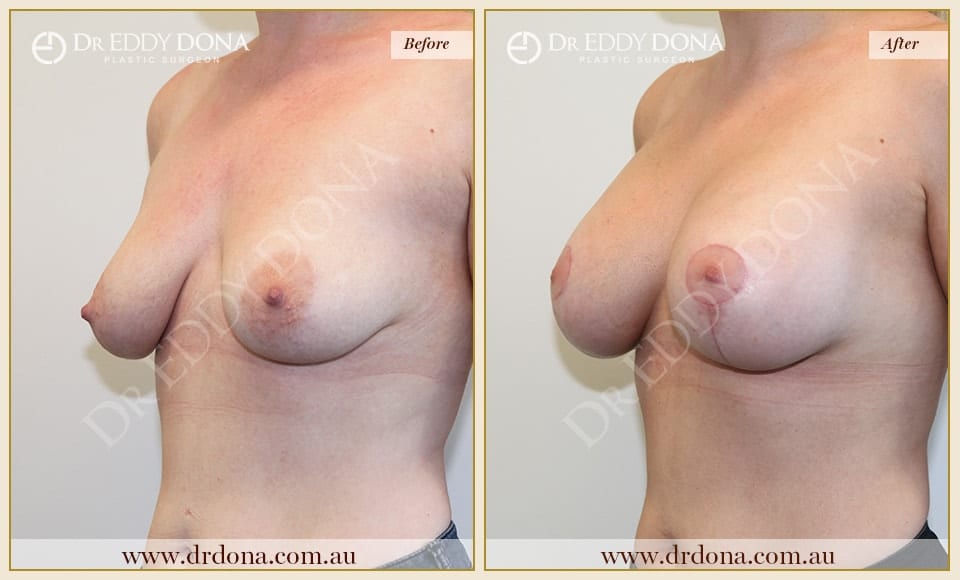
No Implants
23yo, 163cm, 55kg, 0 Children


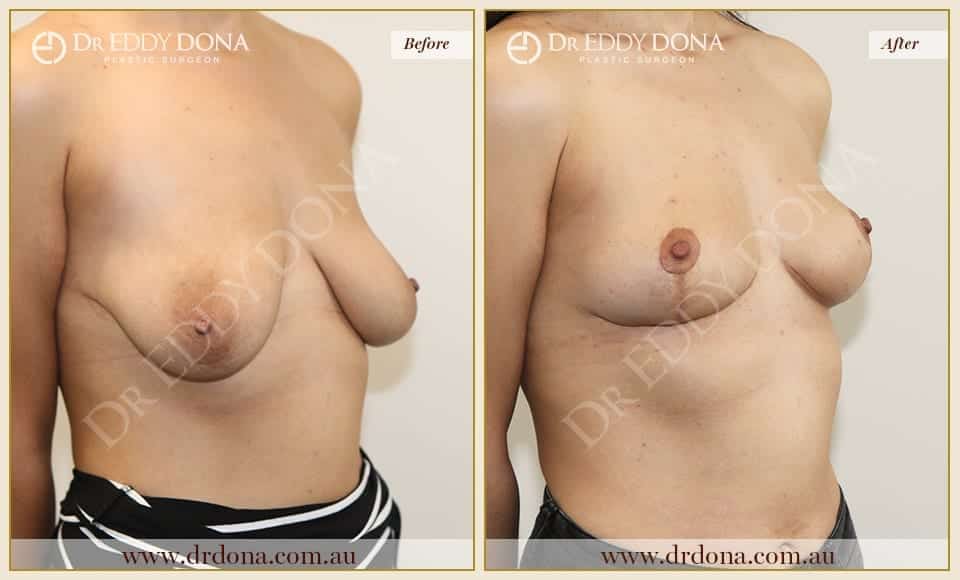
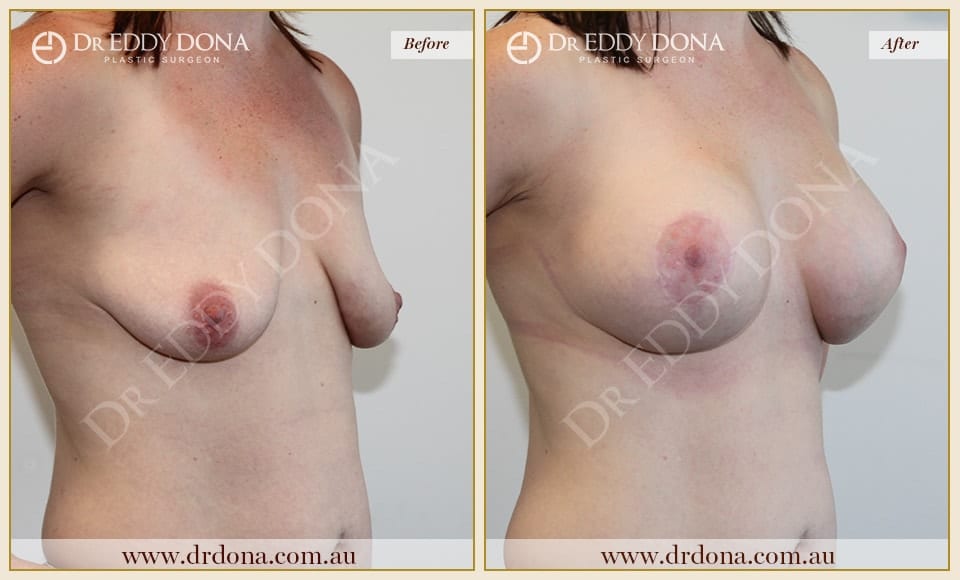
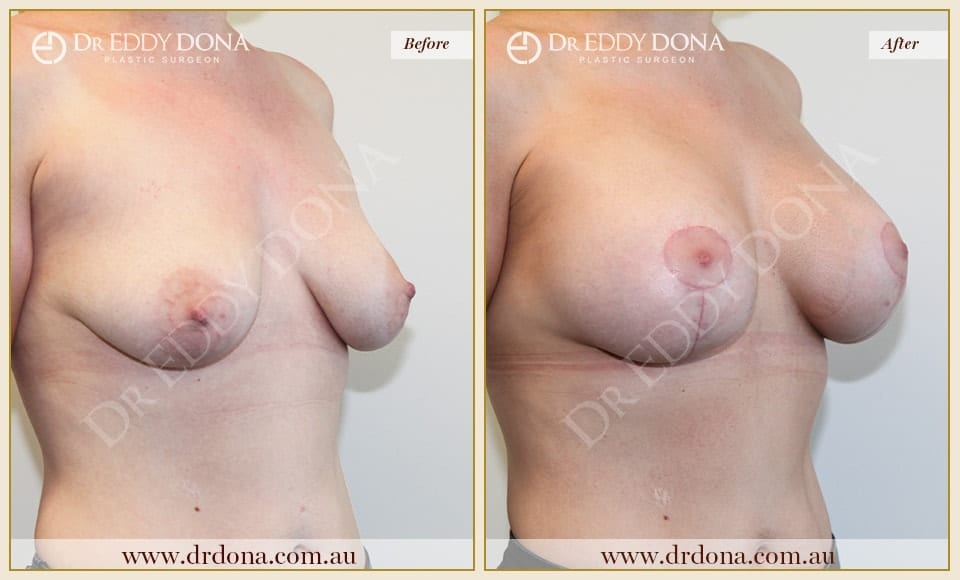
No Implants
23yo, 173cm, 66kg, 0 Children


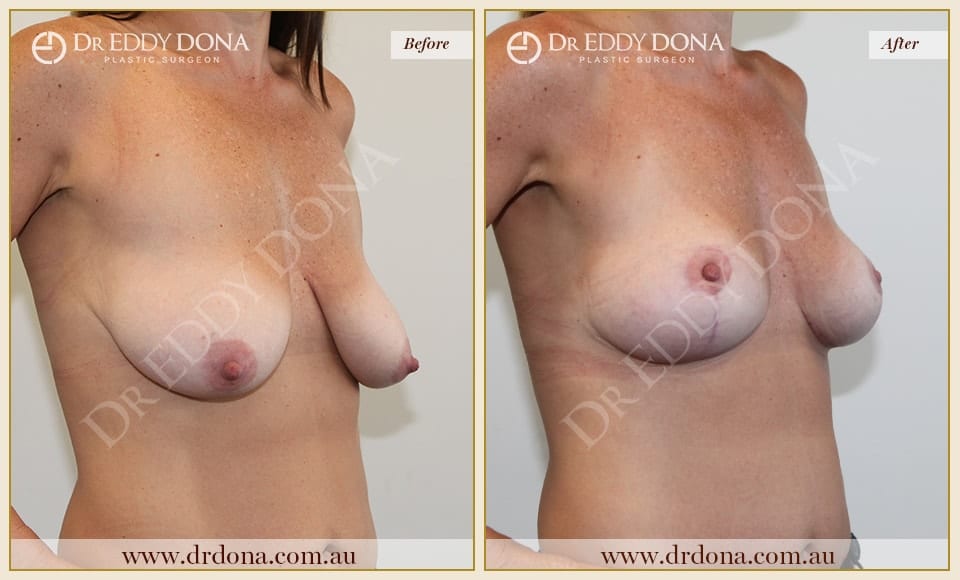
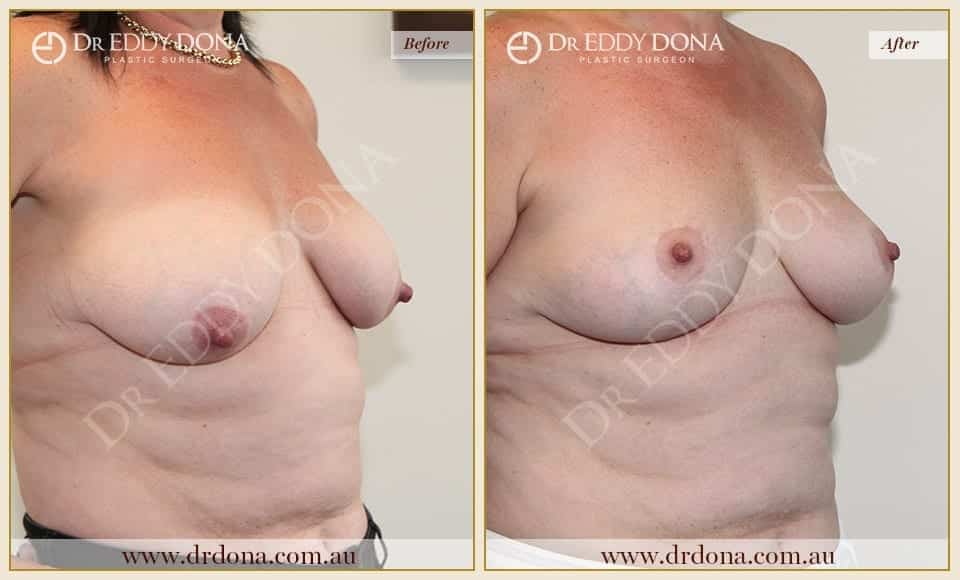
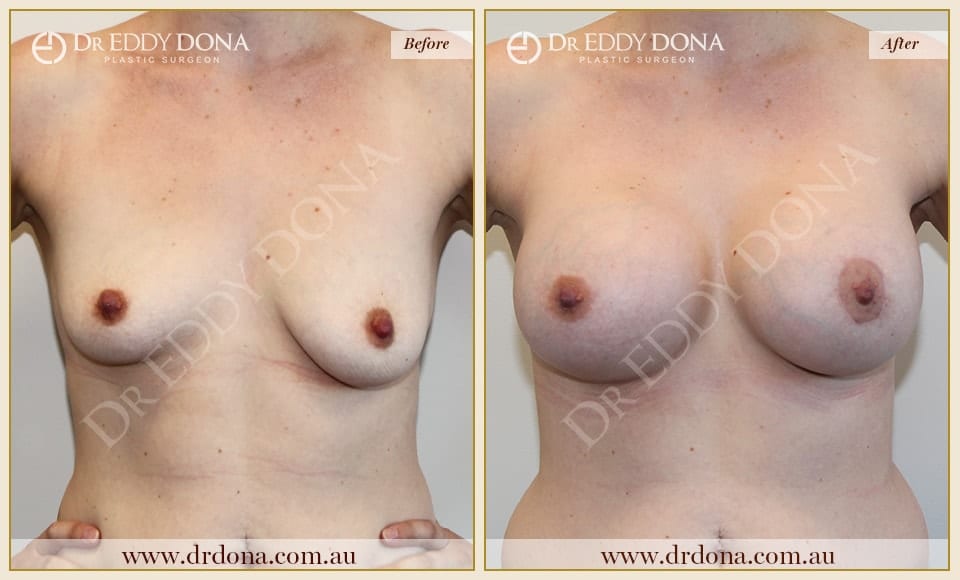
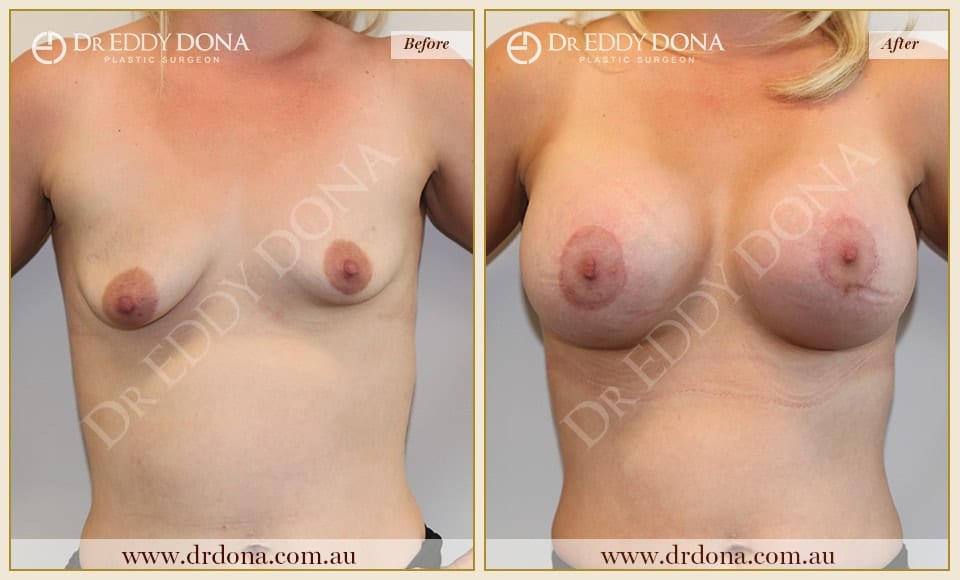
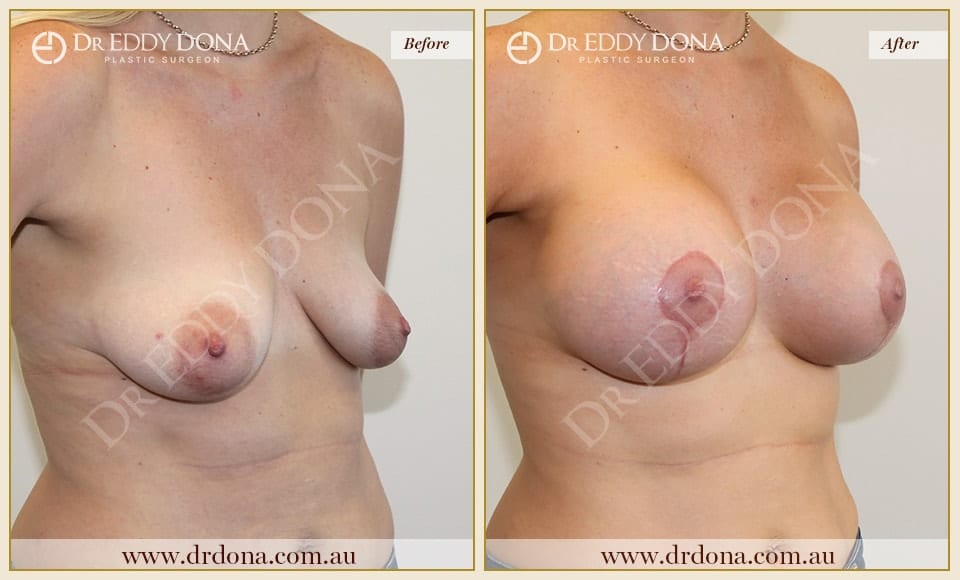
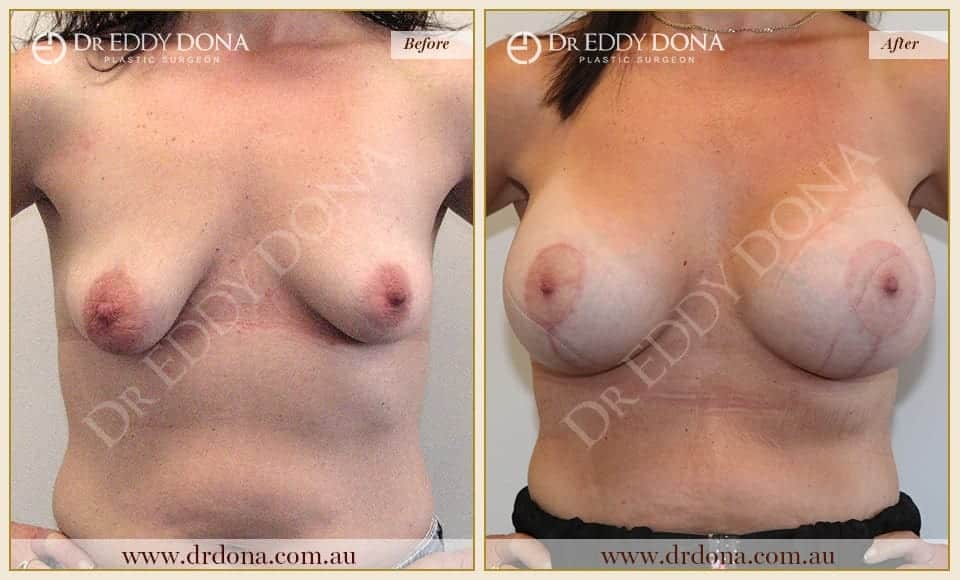
Stage 1 – Breast Lift
26yo, 155cm, 58kg, 0 Children
Stage 2 – Breast Augmentation
325cc Round, Moderate Plus Profile, Dual Plane


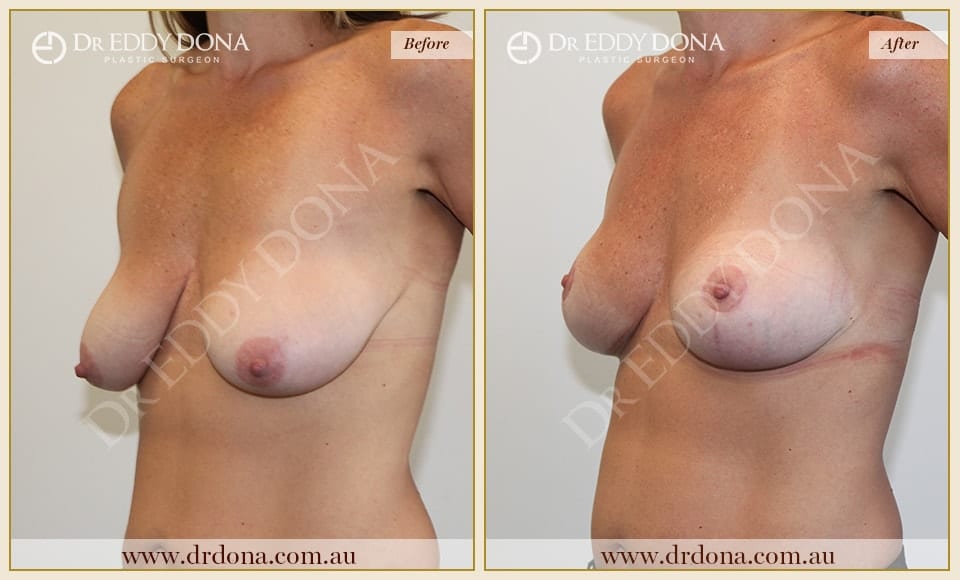
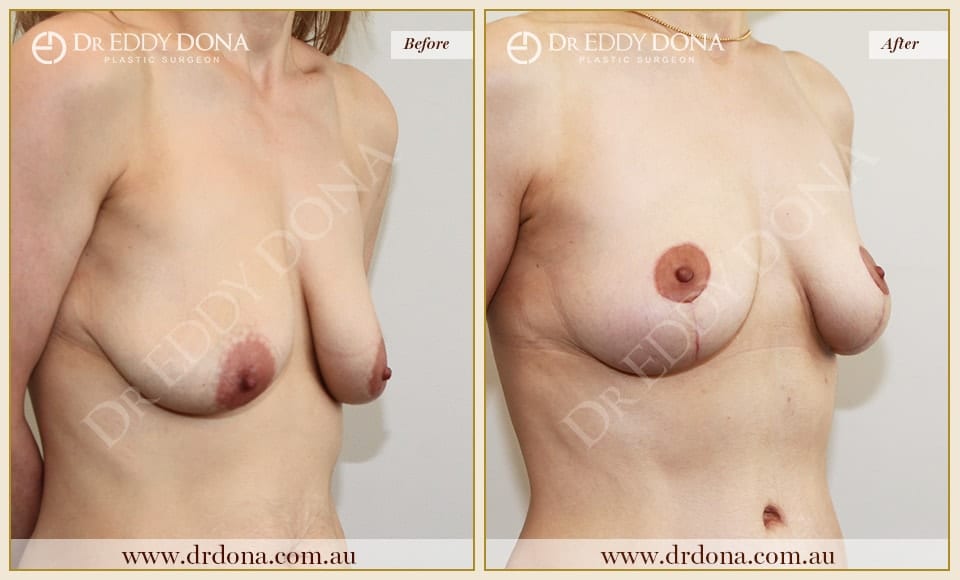
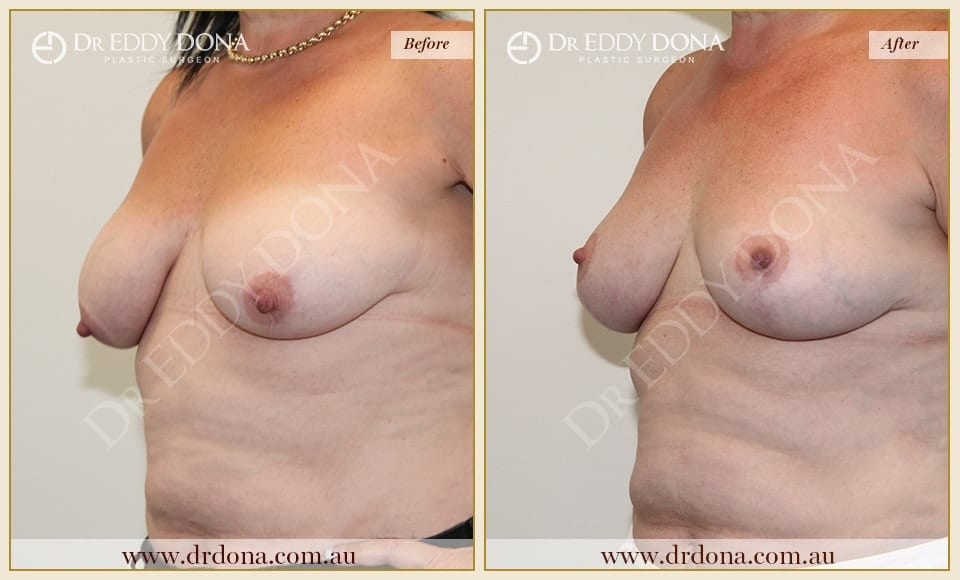
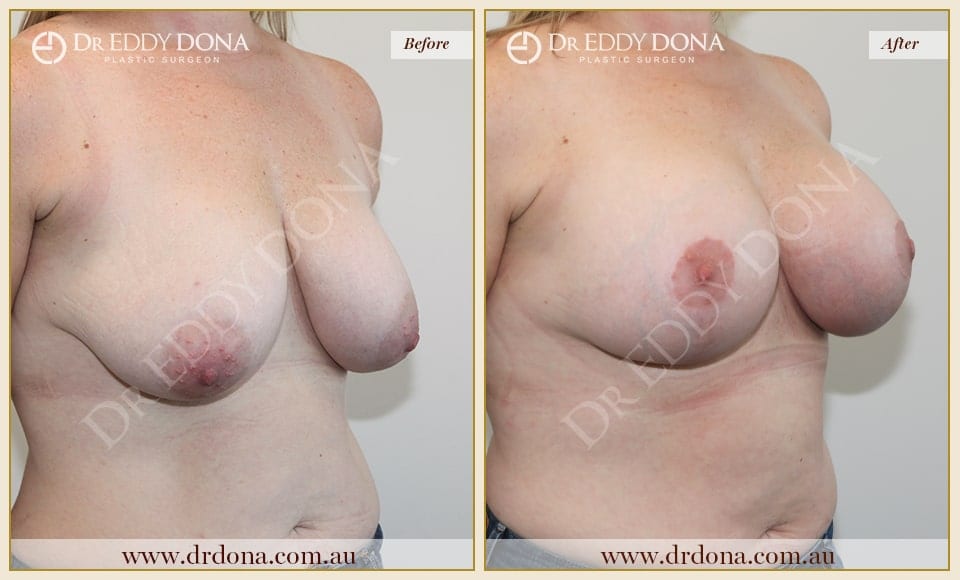
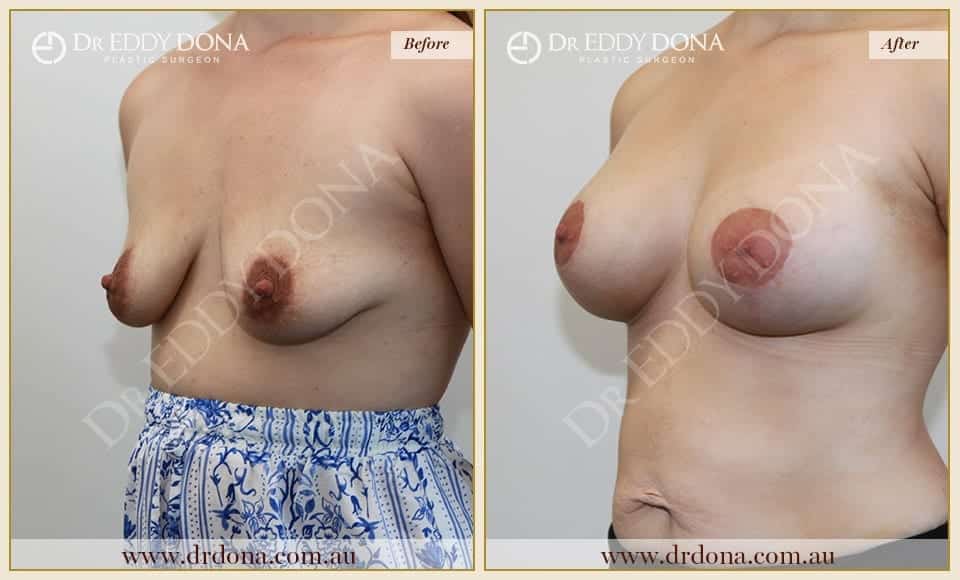
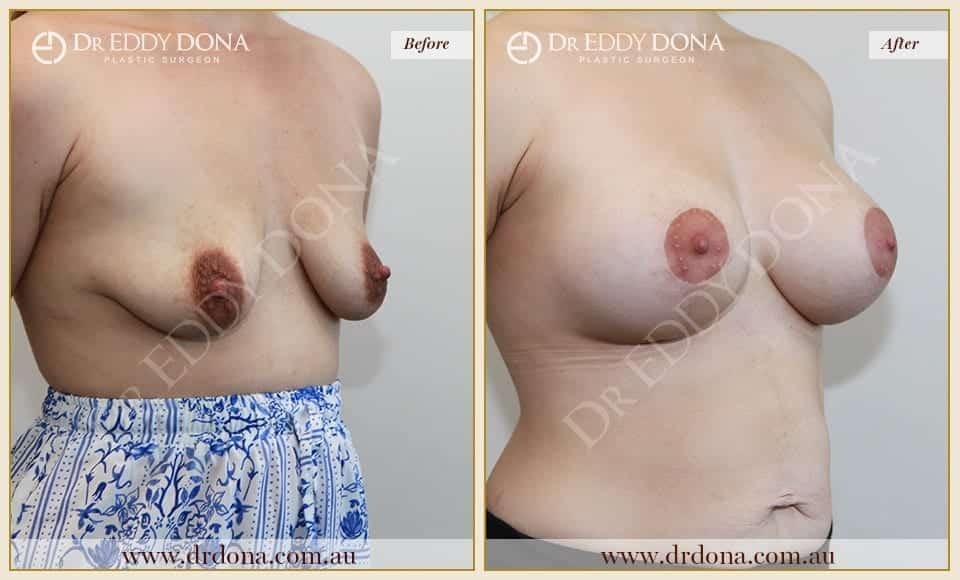
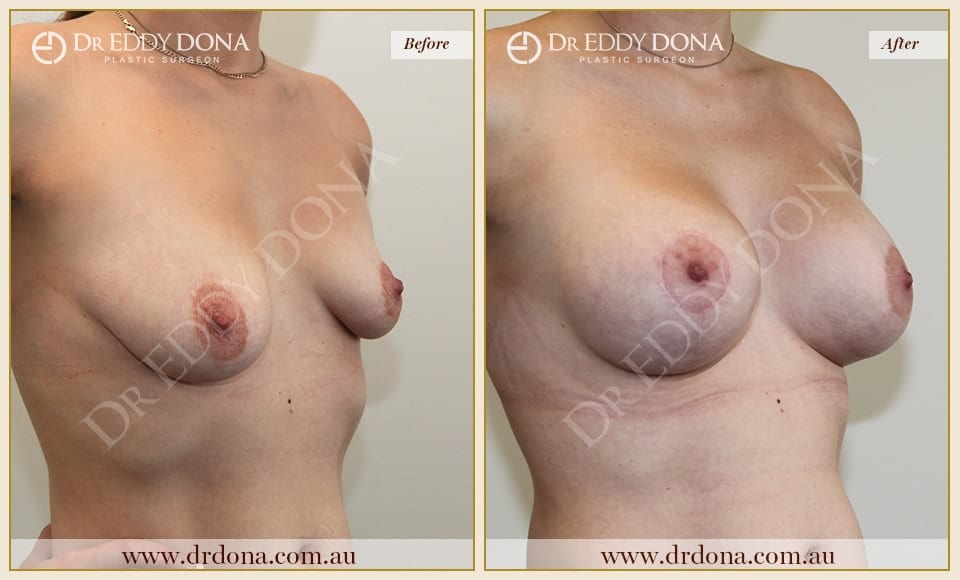
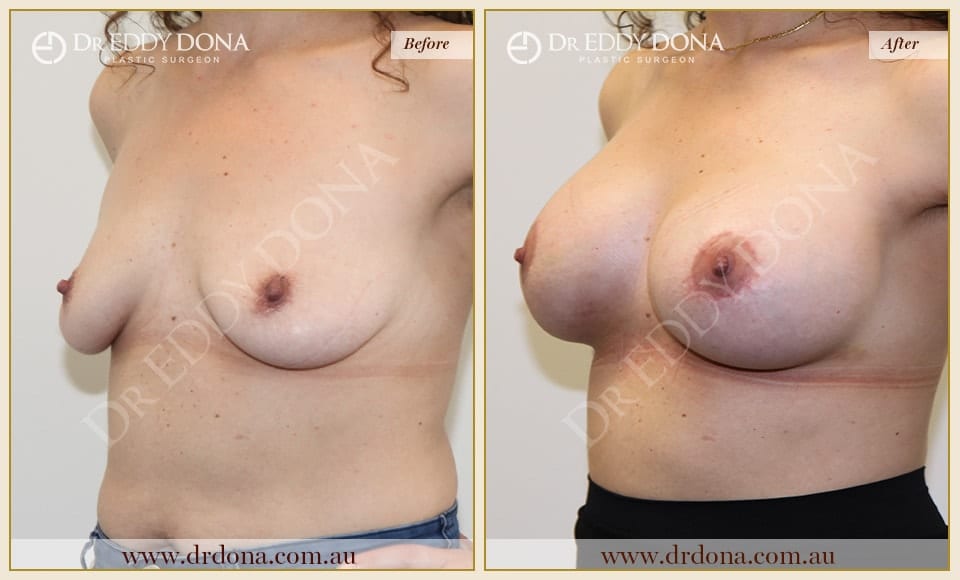
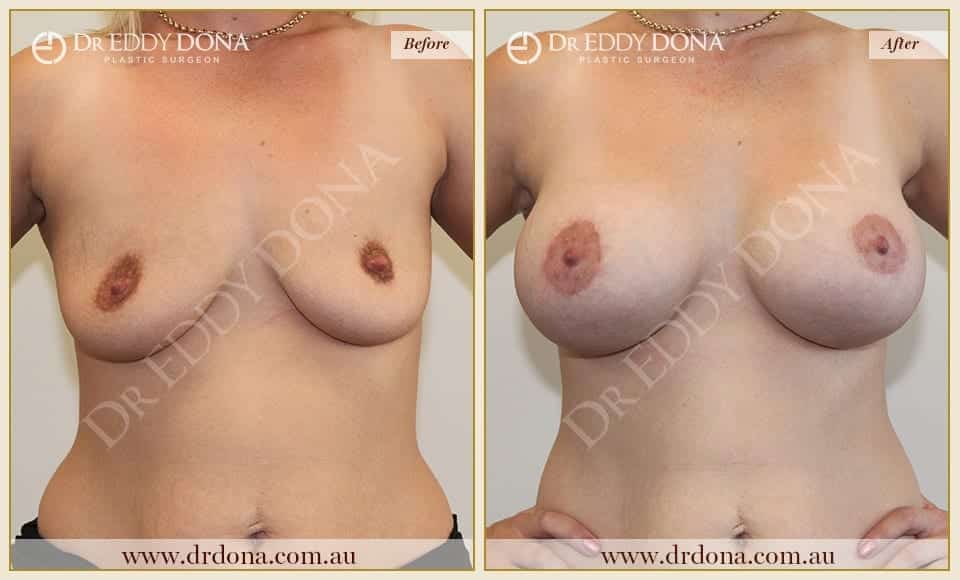
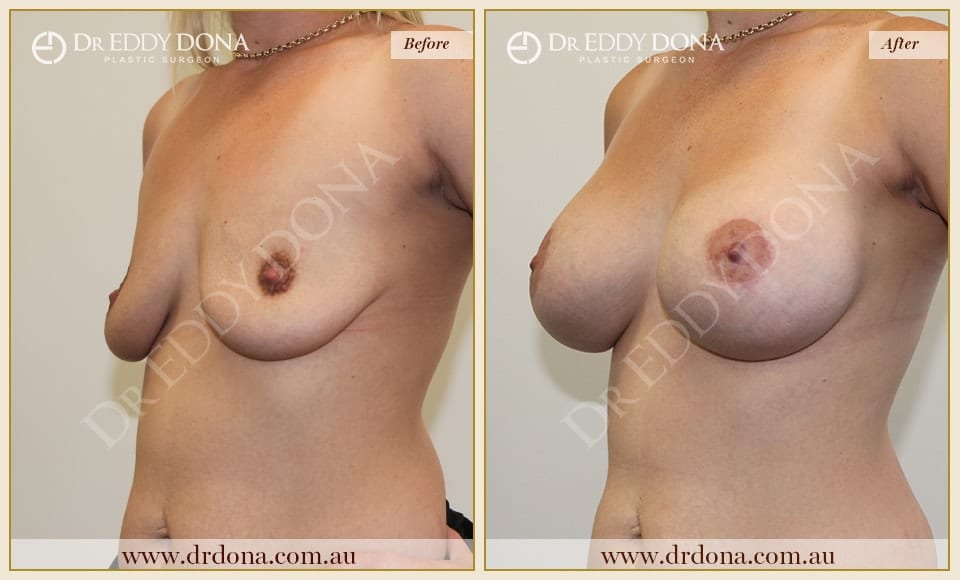
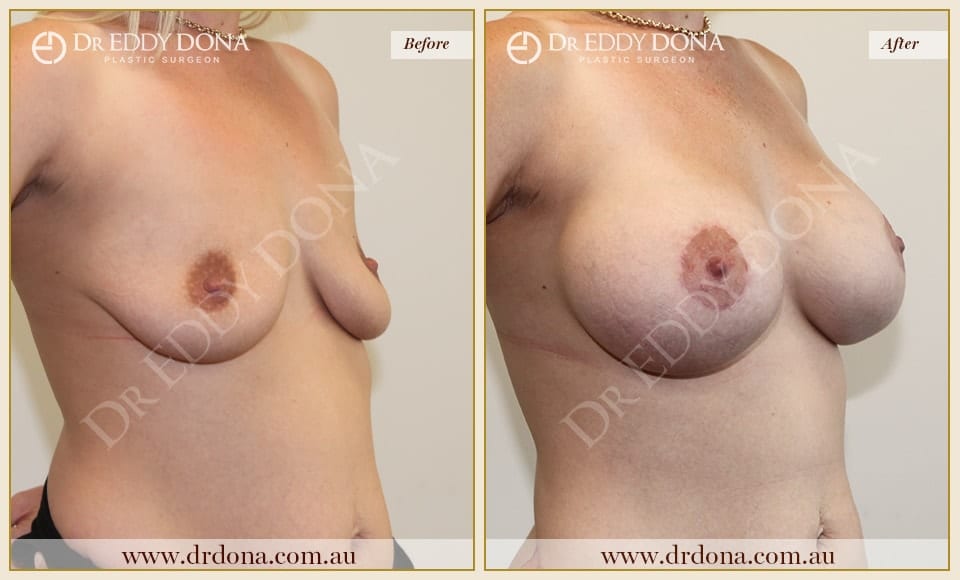
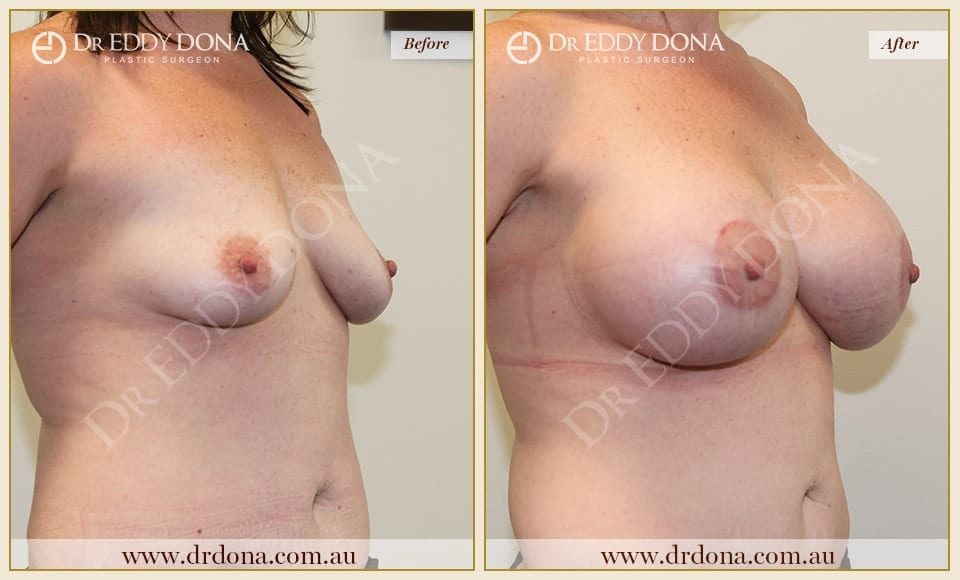
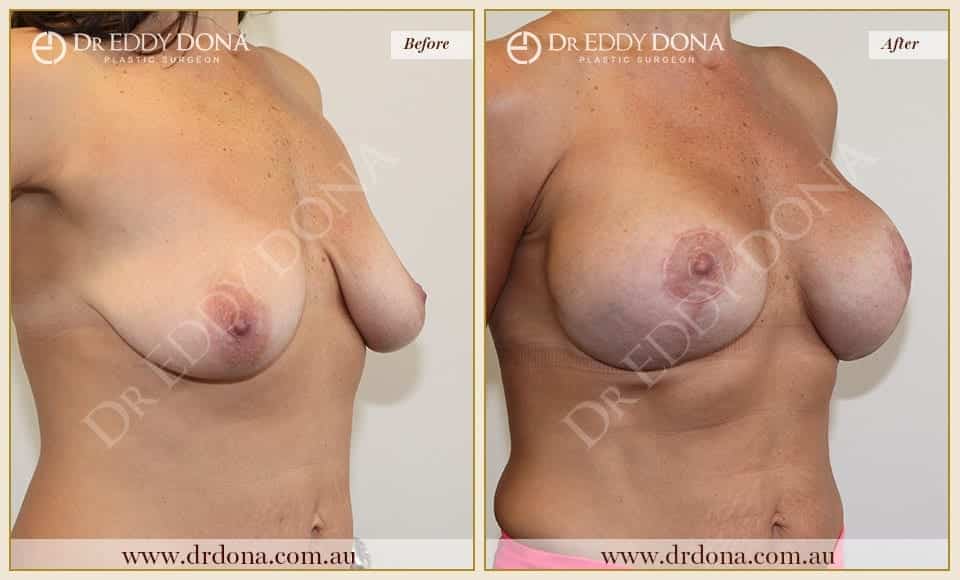
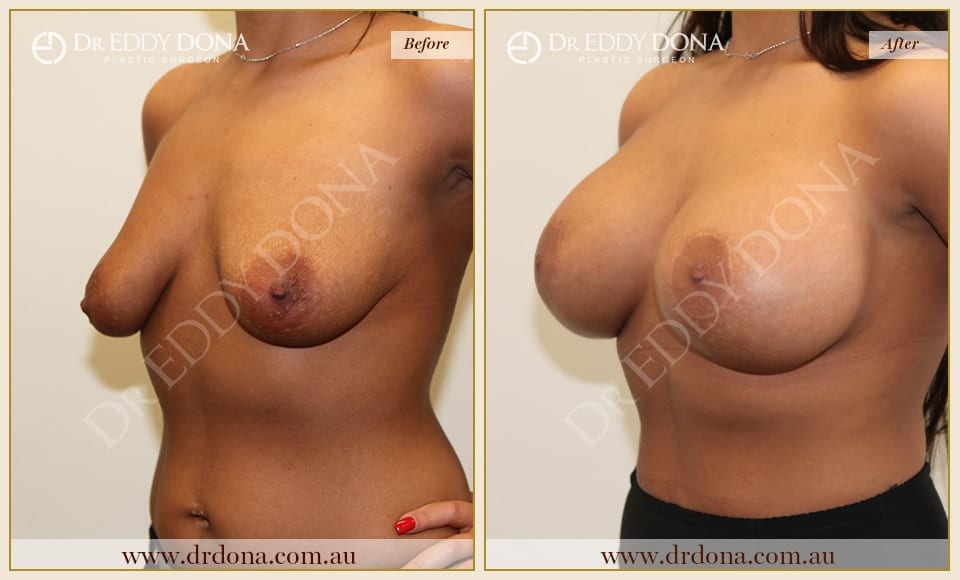
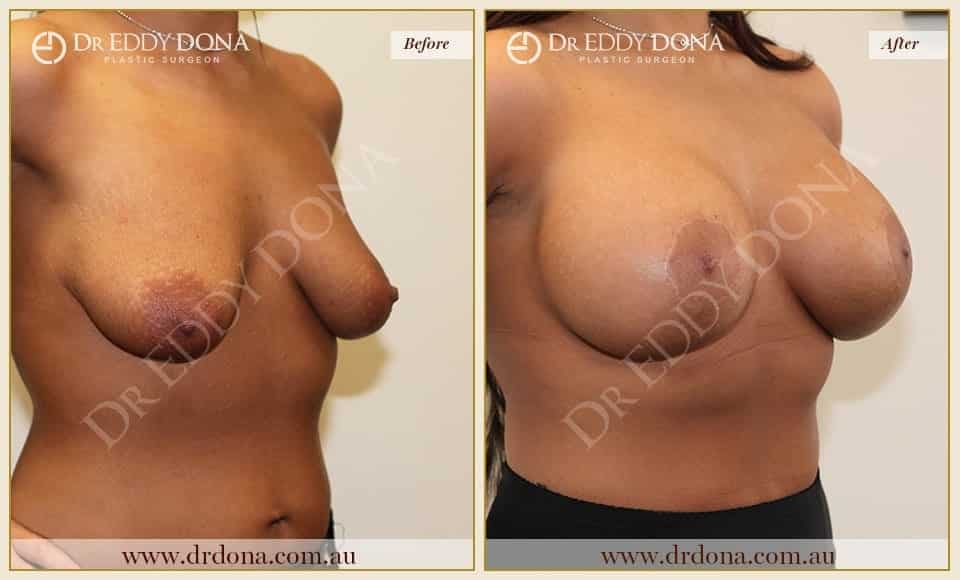
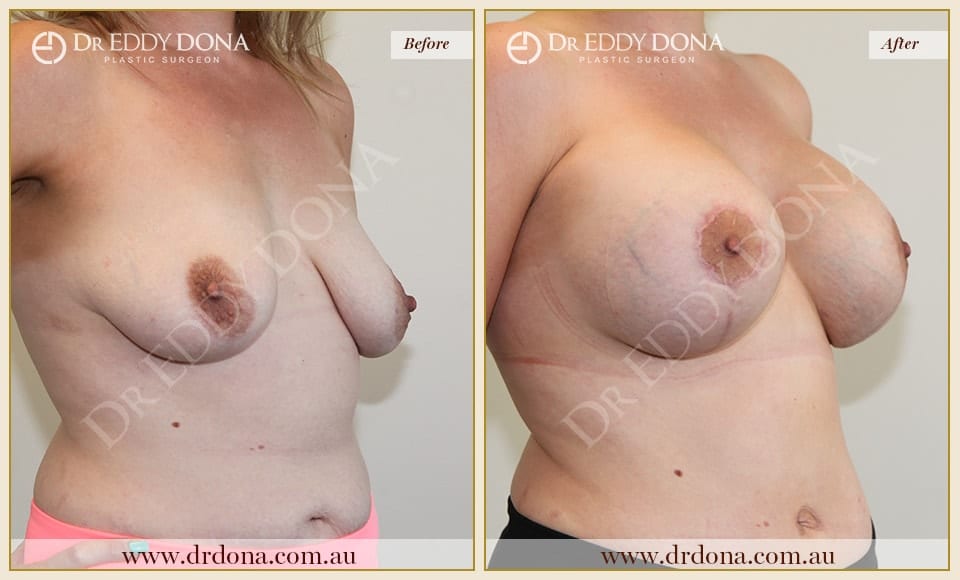
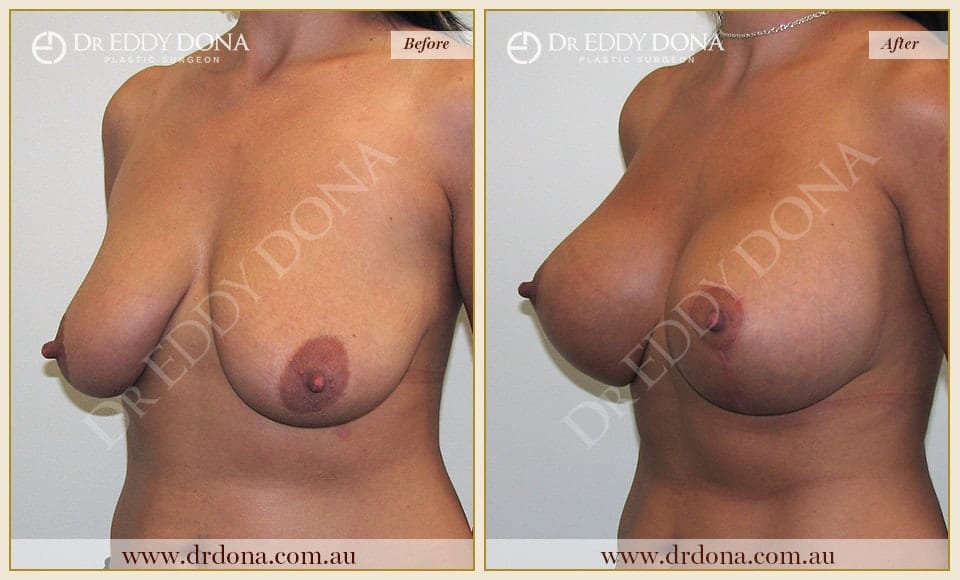
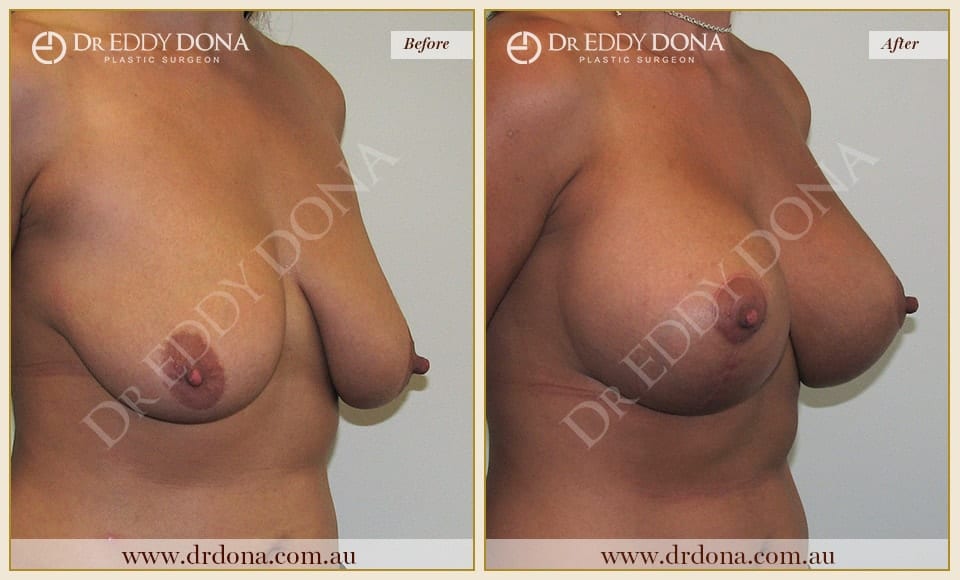
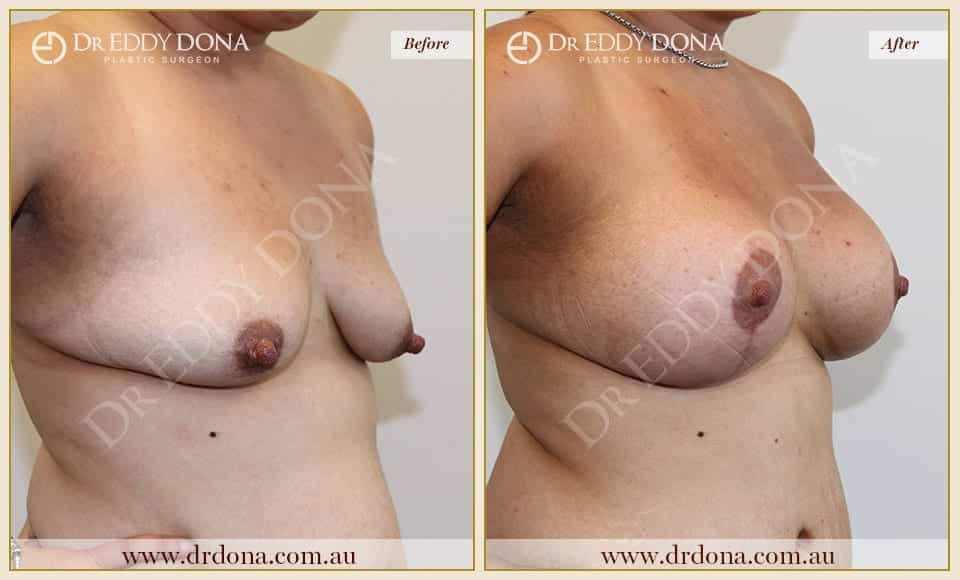
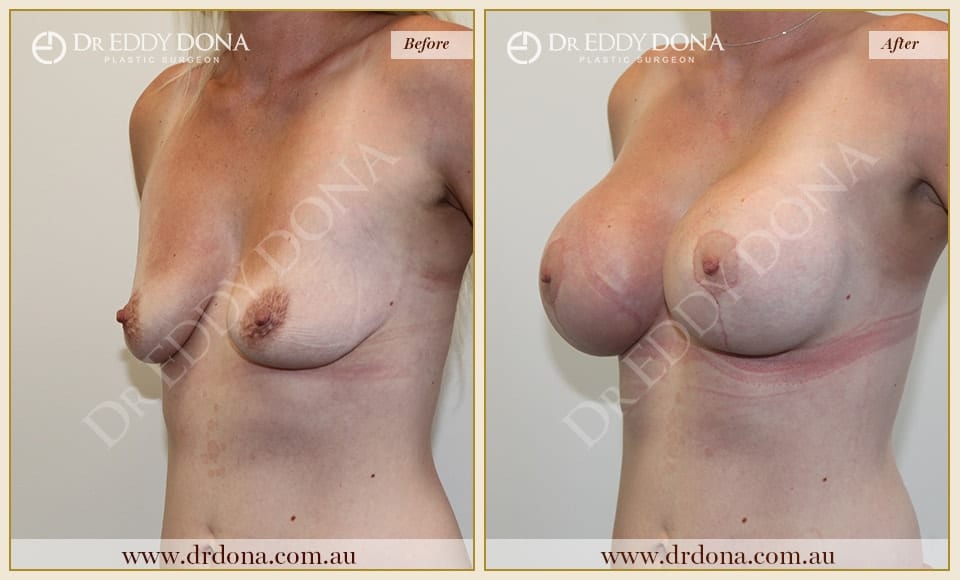
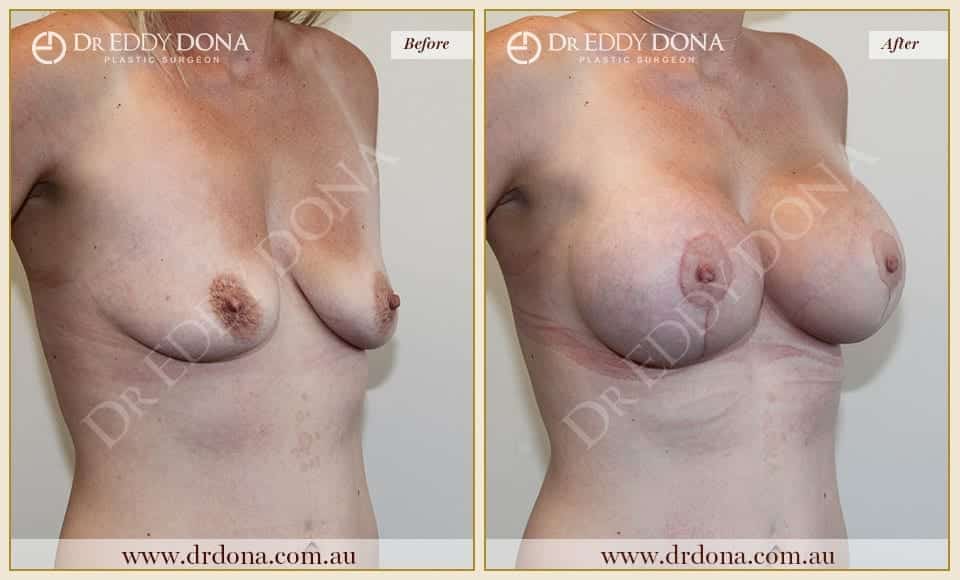
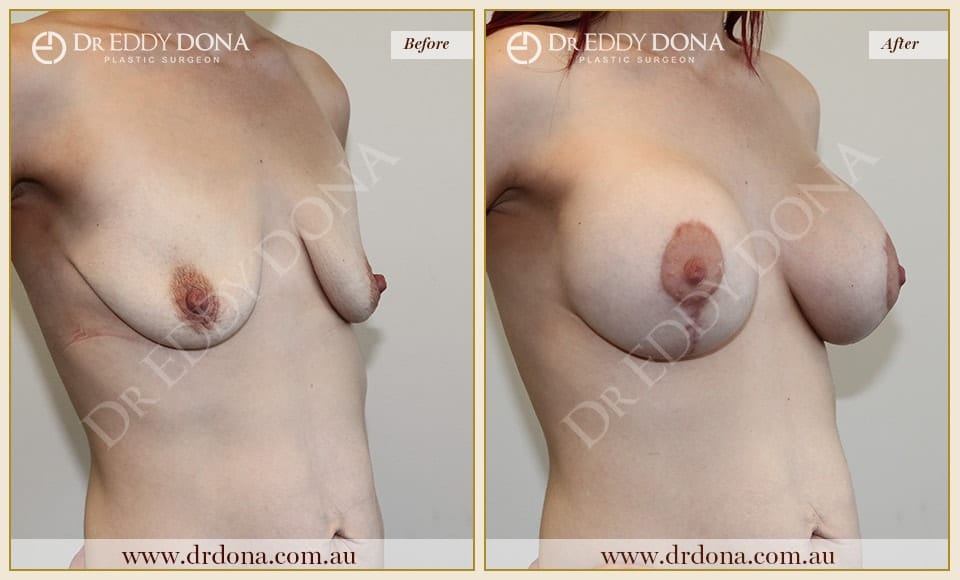
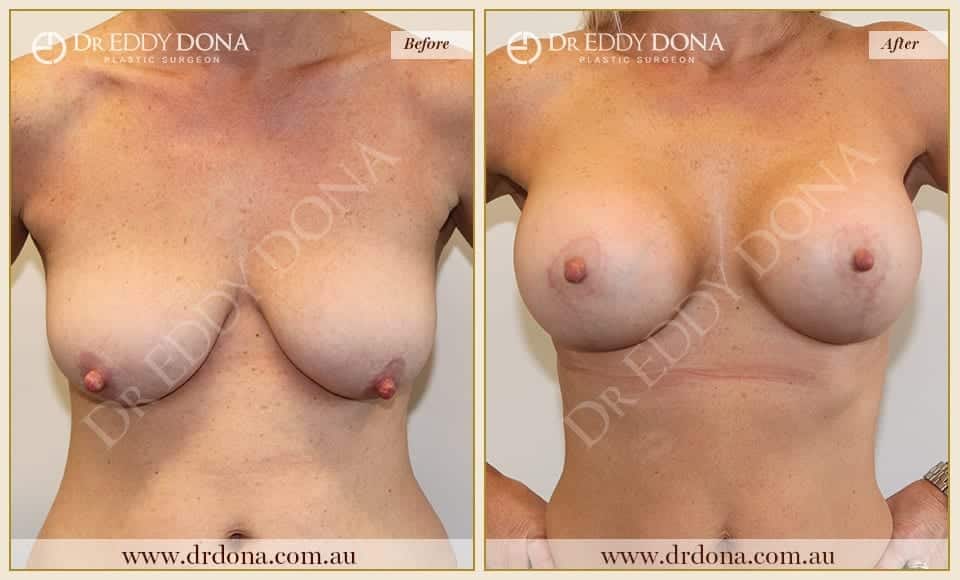
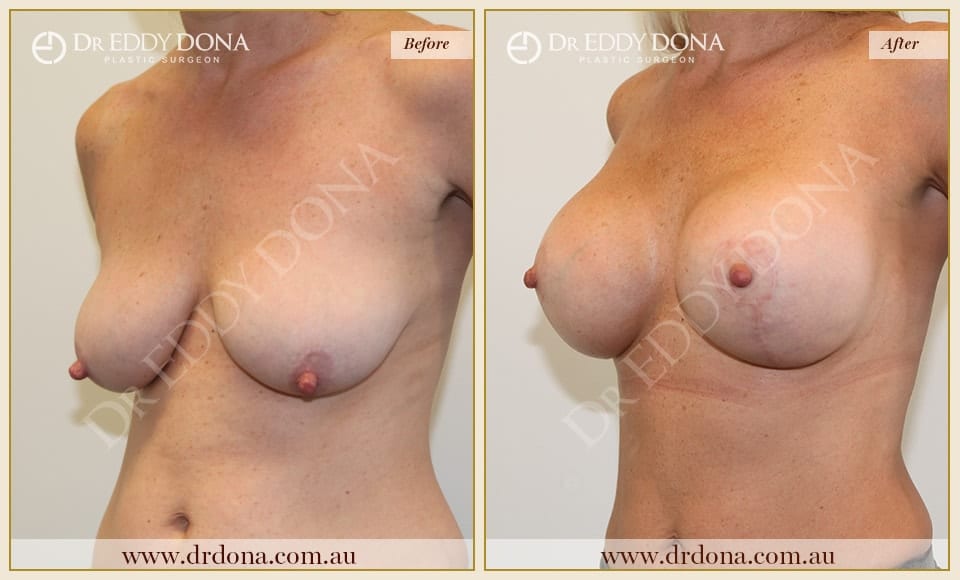
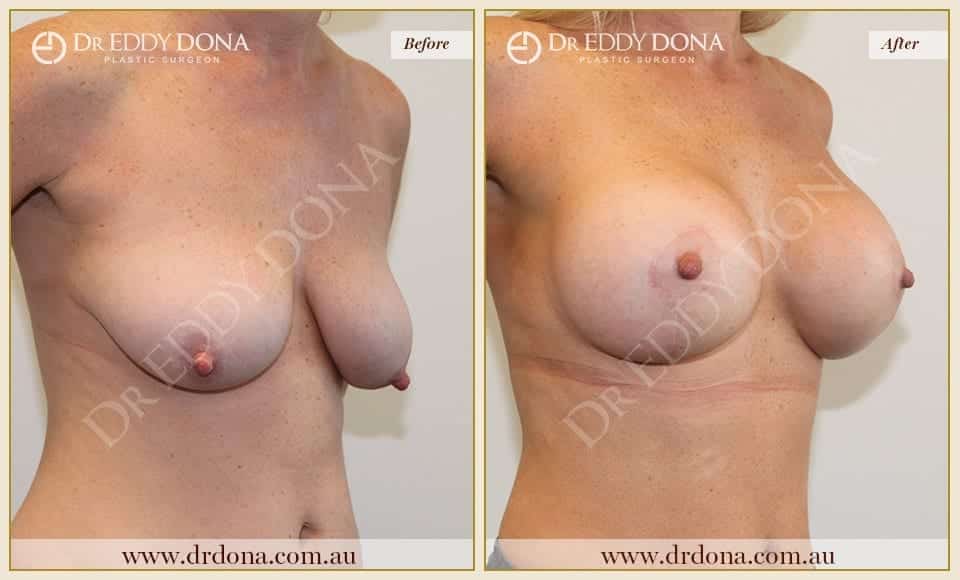
Stage 1 – Breast Lift and Removal of Implants
Anchor Scar Breast Lift with Capsulectomy and Removal 300cc Saline Implants
Stage 2 – Breast Augmentation
685cc Anatomical, High Profile, Subglandular


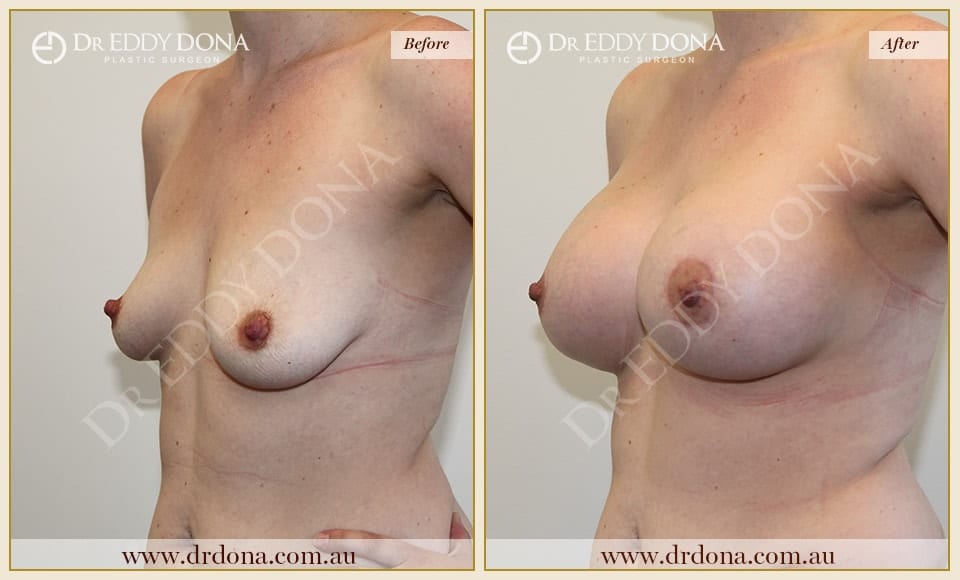
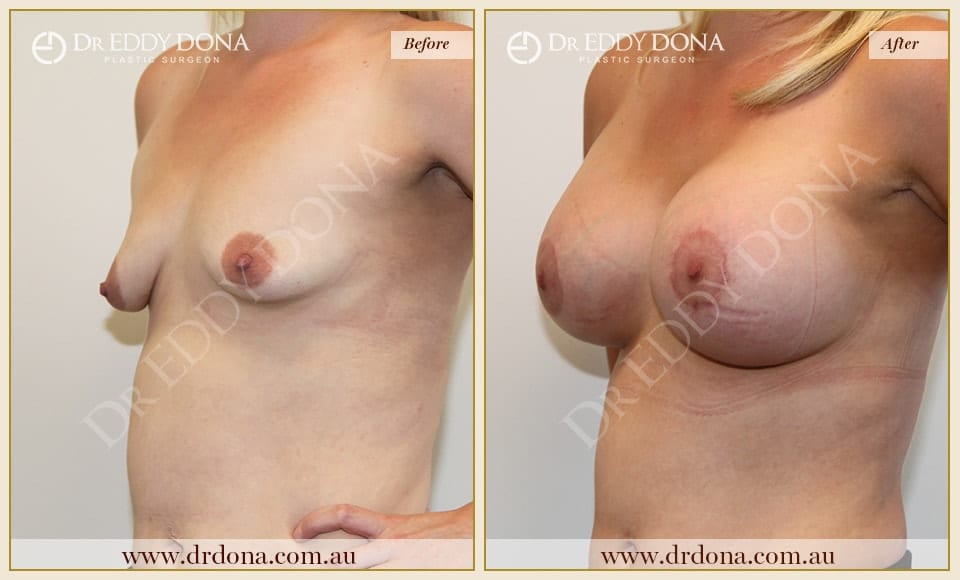
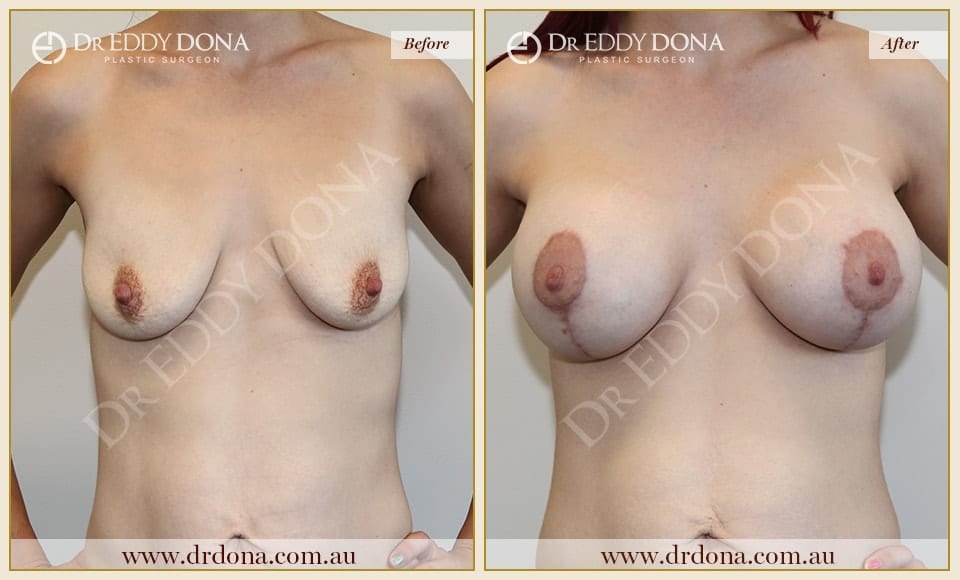
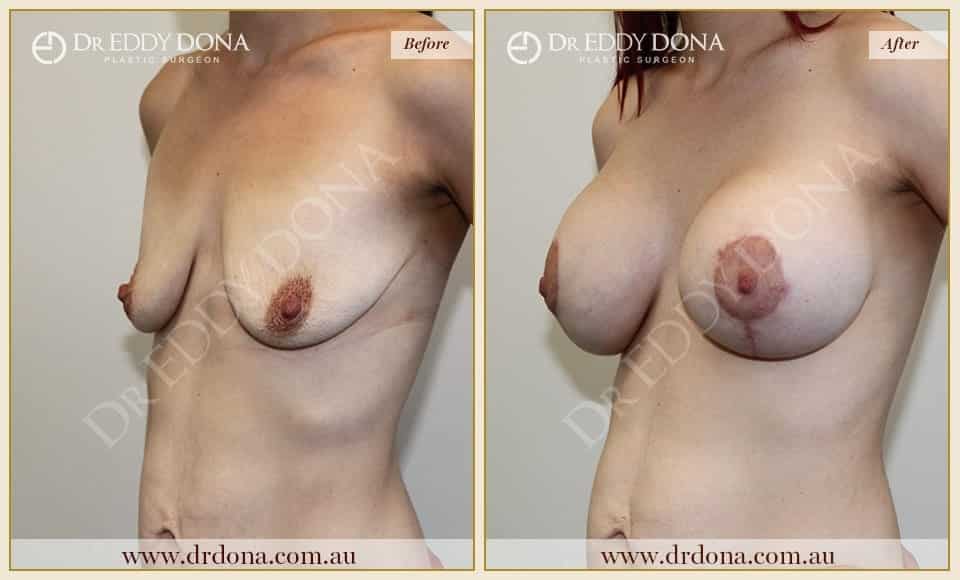
Stage 1 – Breast Lift
37yo, 160cm, 78kg, 2 Children
Stage 2 – Breast Augmentation
600cc Round, High Profile, Dual Plane


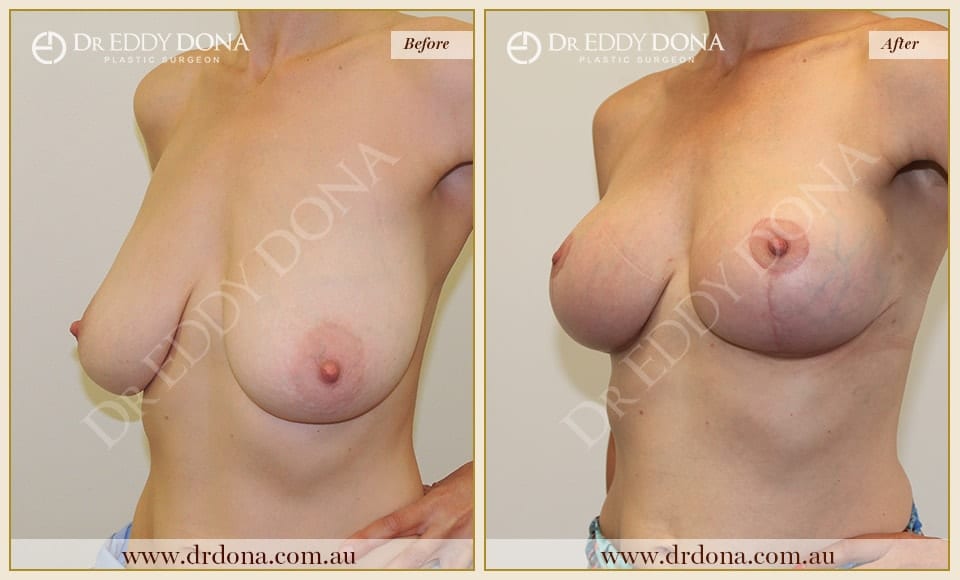
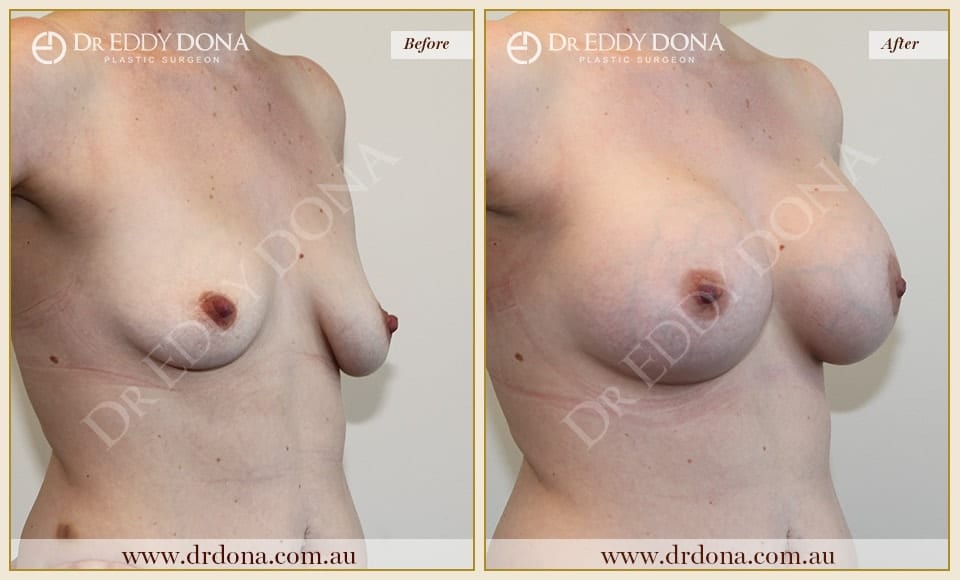
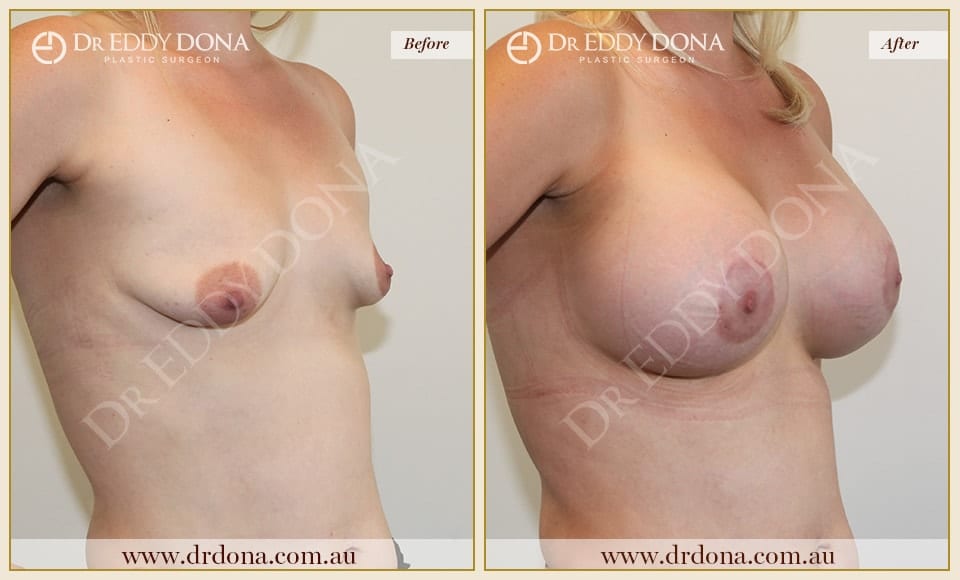
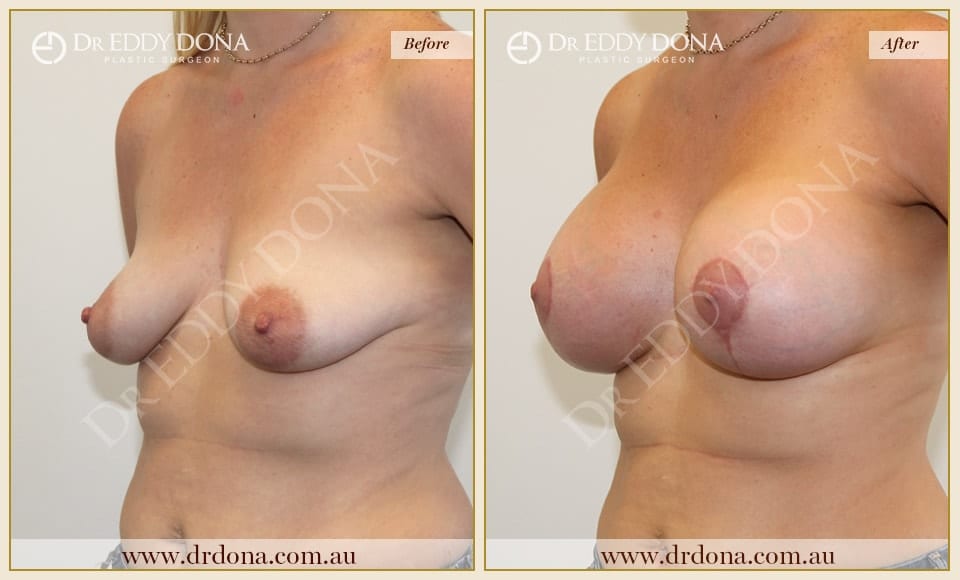
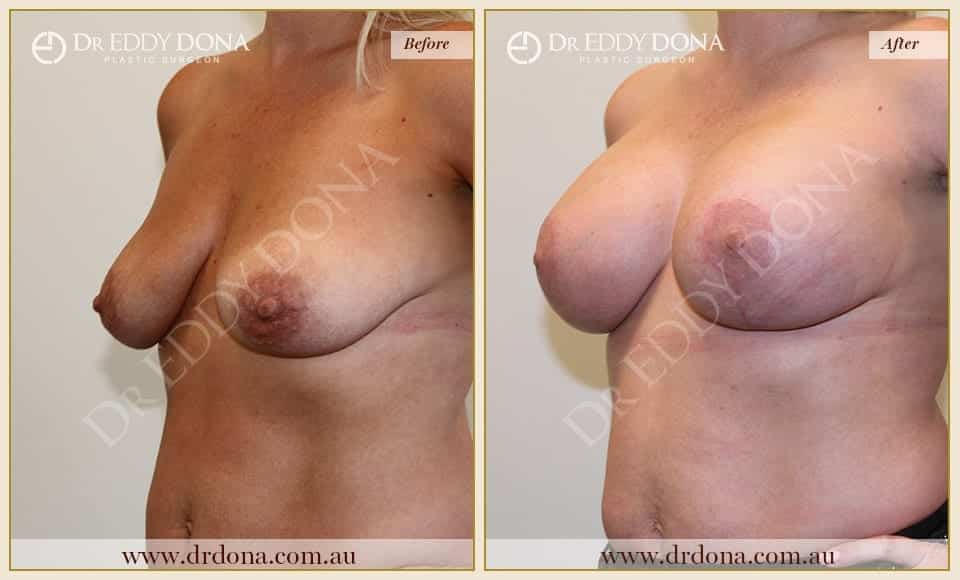
Stage 1 – Breast Lift
38yo, 170cm, 79kg, 2 Children
Stage 2 – Breast Augmentation
400cc Round, Moderate Plus Profile, Subglandular


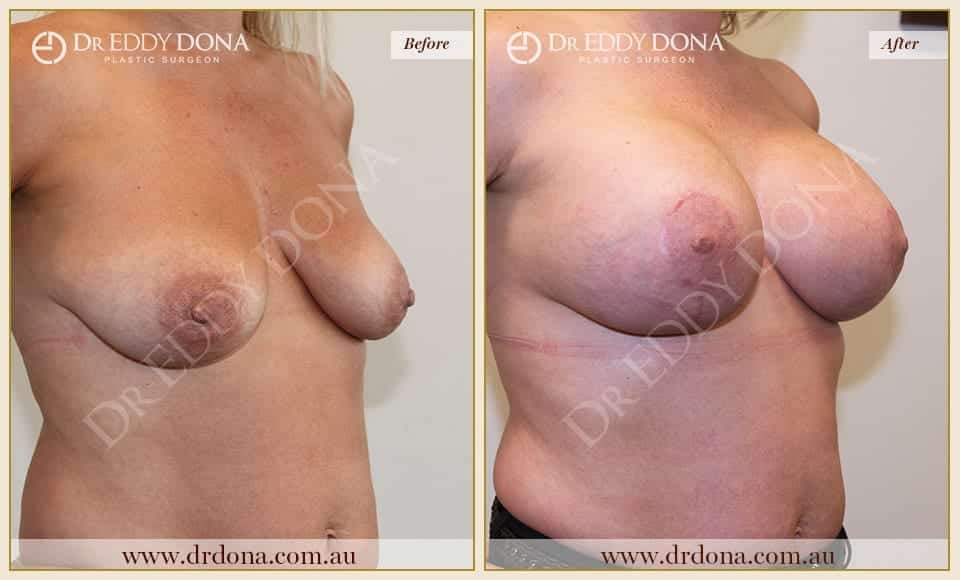
Stage 1 – Breast Lift
29yo, 170cm, 68kg, 2 Children
Stage 2 – Breast Augmentation
470cc Round, Moderate Profile, Subglandular


Circumareolar Lift and Implants
21yo, 154cm, 57kg, 0 Children
420cc Anatomical, Moderate Plus Profile, Dual Plane


Lollipop Lift and Implants
25yo, 160cm, 60kg, 2 Children,
390cc Anatomical, High Profile, Dual Plane


Right Breast Lollipop Lift and Augmentation / Left Breast Augmentation Only
32yo, 160cm, 55kg, 2 Children
Right 330cc Left 390cc Round, Moderate Profile, Dual Plane


Right Breast Augmentation Only / Left Breast Circumareolar Lift and Augmentation
29yo, 165cm, 53kg, 4 Children
Right 460cc Left 420cc Round, Full Profile, Dual Plane


Right Breast Augmentation Only / Left Breast Circumareolar Lift and Augmentation
32yo, 165cm, 62kg, 2 Children
330cc Round, Moderate Profile, Dual Plane


Circumareolar Lift with Implants
31yo, 165cm, 62kg, 4 Children
445cc Anatomical, Extra Full Profile, Dual Plane


Circumareolar Lift with Implants
28yo, 160cm, 57kg, 1 Child
620cc Round, Extra Full Profile, Dual Plane


Circumareolar Lift with Implants
25yo, 165cm, 65kg, 2 Children
560cc Round, Full Profile, Dual Plane


Circumareolar Lift with Implants
37yo, 162cm, 60kg, 1 Child
460cc Textured, Moderate Profile, Dual Plane


Circumareolar Lift with Implants
36yo, 152cm, 56kg, 3 Children
560cc Full Projection, Dual Plane


Circumareolar Lift with Implants
32yo, 172cm, 64kg, 3 Children
560cc Round, Full Profile, Dual Plane


Circumareolar Lift with Implants
38yo, 158cm, 55kg, 4 Children
560cc Round, Full Profile, Dual Plane


Lollipop Lift with Implants
41yo, 167cm, 61kg, 2 Children
415cc Round, Full Profile, Dual Plane


Lollipop Lift with Implants
34yo, 165cm, 64kg, 3 Children
450cc Round, Full Profile, Dual plane


Lollipop Lift with Implants
35yo, 170cm, 74kg, 2 Children
520cc Left 560cc Right Round, Full Profile, Dual Plane


Lollipop Lift with Implants
25yo, 164cm, 63kg, 0 Children
520cc Round, Full Profile, Dual Plane


Lollipop Lift with Implants
30yo, 160cm, 60kg, 3 Children
525cc Round, Extra Full Profile, Dual Plane


Lollipop Lift with Implants
32yo, 167cm, 70kg, 3 Children
560cc Round, Extra Full Profile, Dual Plane


Lollipop Lift with Implants
35yo, 180cm, 79kg, 1 Child
695cc Round, Full Profile, Dual Plane


Lollipop Lift with Implants
35yo, 160cm, 68kg, 3 Children
385cc Round, Full Profile, Dual Plane


Lollipop Lift with Implants
47yo, 165cm, 70kg, 4 Children
360cc Round, Full Profile, Dual Plane


Lollipop Lift with Implants
28yo, 156cm, 48kg, 2 Children
390cc Round, Full Profile, Dual Plane


Lollipop Lift with Implants
41yo, 164cm, 64kg, 3 Children
460cc Round, Full Profile, Dual Plane


Lollipop Lift with Implants
23yo, 167cm, 63kg, 2 Children
520cc Round, Extra Full Profile, Dual Plane


Lollipop Lift with Implants
28yo, 160cm, 47kg, 3 Children
420cc Round, Extra Full Profile, Dual Plane


Lollipop Lift with Implants
37yo, 157cm, 62kg, 4 Children
420cc Round, Full Profile, Dual Plane


Lollipop Lift with Implants
38yo, 165cm, 52kg, 1 Child
420cc Round, Full Profile, Dual Plane


Lollipop Lift with Implants
41yo, 152cm, 56kg, 2 Children
520cc Round, Full Profile, Dual Plane


Lollipop Lift with Implants
31yo, 168cm, 60kg, 0 Children
355cc Anatomical, Moderate Profile, Dual Plane
A breast lift, known as a mastopexy is performed to correct breasts that appear droopy or saggy, creating fuller and perkier breasts. The procedure involves lifting the position of the nipple and often, increasing the breast volume, especially in the upper part of the breasts.
Saggy breasts may occur because they developed that way, or is more often the case, they become saggy with time. The skin and ligaments which maintain the youthful shape of the breasts stretch and elongate, and lead to sagging and drooping breasts. The sagging is worsened by the loss of natural breast tissue over time. Sagging breasts are a condition that affects women of all ages.
When performing a breast lift, regardless of whether an implant is required, there are three types of scar patterns that may be used for the procedure. These are as follows:
Circumareolar “doughnut” technique or Benelli technique – This technique involves a circular incision made around the areola. This is a minimally invasive procedure that achieves a small degree of lift. It results in a scar around the areolar and is also suitable for reducing the size of the areolar. However, there is a limit to how much the areolar can be reduced as they typically tend to stretch back out again especially when implants are used. It can also create a very flat looking breast.
Vertical or lollipop technique – This technique got its name ‘lollipop’ from the type of scar it leaves. The technique results in a scar that extends around the areola and down the midline of the breast to the lower breast fold. Although this procedure is slightly more invasive, it achieves a larger degree of lift with some slight reduction in natural breast tissue volume.
Anchor technique – The same as a lollipop technique, this technique also includes a scar along the lower breast fold, hence, an anchor pattern. This is required in those who require a significant lift and possibly need a reduction in natural breast tissue volume.
Learn more about our procedures or schedule a one-on-one consultation at our Sydney clinic
Call us 1300 DR DONA (1300 37 3662)